Physics:Haze (optics)
There are two different types of haze that can occur in materials:
- Reflection haze occurs when light is reflected from a material.
- Transmission haze occurs when light passes through a material.
The measurement and control of both types during manufacture is essential to ensure optimum quality, acceptability and suitability for purpose of the product. For instance, in automotive manufacturing, a high quality reflective appearance is desirable with low reflection haze and high contrast whilst in packaging clear, low haze, highly transmissive films are required so that the contents, foods etc., can be clearly observed.
Reflection Haze
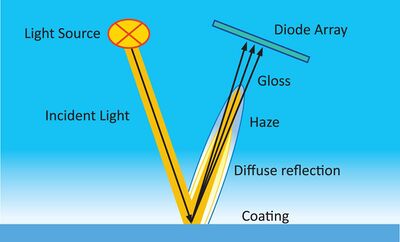
Reflection Haze is an optical phenomenon usually associated with high gloss surfaces, it is a common surface problem that can affect appearance quality. The reflection from an ideal high gloss surface should be clear and radiant, however, due to scattering at imperfections in the surface caused by microscopic structures or textures (≈ 0.01 mm wavelength) the reflection can appear milky or hazy reducing the quality of its overall visual appearance.
Causes of this could be due to a number of factors –
- Poor dispersion
- Method of applying the coating
- Variations in drying, curing or baking
- Types of materials used in the formulation
- Polishing or abrasion
A high gloss surface with haze exhibits a milky finish with low reflective contrast- reflected highlights and lowlights are less pronounced. On surfaces with haze, halos are visible around the reflections of strong light sources.
Measurement
Measurement of reflection haze is primarily defined under three International test standards:
ASTM E430 [1]
ASTM E430 comprises three test methods:
Test method A specifies a 30° angle for specular gloss measurement, 28° or 32° for narrow-angle reflection haze measurement and 25° or 35° for wide-angle reflection haze measurement.
Test method B specifies a 20° angle for specular gloss measurement and 18.1° and 21.9° for narrow-angle reflection haze measurement.
Test method C specifies a 30° angle for specular gloss measurement, 28° or 32° for narrow-angle reflection haze measurement and 15° wide-angle reflection haze measurement.
ASTM D4039 [2]
Test method specifies gloss measurements to be made at 20° and 60°, the haze index is then calculated as the difference between the 60° and 20° measurements.
ISO 13803 [3]
Test method specifies a 20° angle for specular gloss measurement and 18.1° and 21.9° for narrow-angle reflection haze measurement.
All test methods specify that measurements should be made with visible light according to CIE spectral luminous efficiency function V(λ) in the CIE 1931 standard observer and CIE standard illuminant C.
As most commercially available glossmeters have gloss measurement angles of 20°, 60° and 85° haze measurement is incorporated at either 20° (ISO 13803 / ASTM E430 method B) or at 20° and 60° ( ASTM D4039). There are however some manufacturers that offer glossmeters with measurement angles of 30° and haze measurement in accordance with ASTM E430 Method A and C but are fewer in number, therefore for the purposes of detailing haze measurement theory only the first three methods will be included.
ISO 13803 / ASTM E430 method B
Both test methods measure specular gloss and haze together at 20° that means light is transmitted and received at an equal but opposite angle of 20°.
Specular gloss is measured over an angular range that is limited by aperture dimensions as defined in ASTM Test Method D523. The angular measurement range for this at 20° is ±0.9° (19.1° - 20.9°). For haze measurement additional sensors are used either side of this range at 18.1° and 21.9° to measure the intensity of the scattered light. Both solid colours and those containing metallics can be measured using this method provided haze compensation is used (as detailed later).
ASTM D4039
This method can only be used on nonmetallic materials having a 60° specular gloss value greater than 70 in accordance with ASTM Test Method D523 / ISO 2813. Haze Index is calculated from gloss measurements made at 20 and 60 degrees as the difference between the two measurements (HI = G60-G20).
As measurements of specular gloss depend largely on the refractive index of the material being measured 20° gloss will change more noticeably than 60° gloss, therefore as haze index is calculated using these two measurements it too will be affected by the refractive index of the material. Evaluations of reflection haze using this test method are therefore confined to samples of roughly the same refractive index.
Haze compensation
It is important to note that the colour (luminous reflectance) of a material can greatly influence the measurement of reflection haze. As colour and haze are both components of scattered light (diffuse reflectance) they must be separated so that only the haze value is quantified; this is also true for metallics or coatings containing metallic pigments where a higher scattering exists.
As test method ASTM D4039 is only suitable for nonmetallic materials of more or less the same refractive index separation of the colour and haze components is not detailed. Haze index calculations and measurements using this test method will therefore produce higher haze results on brighter coloured materials than darker with the same level of haze present. The chart below shows these differences for various colours:-
File:Haze Comp - Uncomp 001.tif
Both ISO 13803 and ASTM E430 method B require a separate measurement of luminous reflectance, Y, to calculate compensated haze. The tri-stimulus value Y gives a measure of the lightness of the material as defined in ISO 7724-2 requiring a 45°/0° geometry to be used with standard illuminant C and 2° observer (although it is mentioned that slightly different conditions will not result in significant errors). Luminous reflectance measurements, Y, are required on both the sample material and a reference white; ISO 13803 details the use of a BaSO4 standard - barium sulphate, a white crystalline solid having a white opaque appearance and high density as this material is a good substitute for a perfectly reflecting diffusor as defined under ISO 7724-2.
Compensated haze can then be calculated as -
H Comp = H Linear – Y Sample / Y BaSO4
Using the ISO / ASTM method therefore to measure luminous reflectance produces a reliable measurement of Y for non-metallic surfaces as the diffuse component is lambertian, i.e. it is equal in amplitude at all angles in relation to the sample surface.
However, for metallic coatings and those containing speciality pigments, as the particles within the coating reflect the light directionally around the specular angle, little or no metallic reflection is present at the angle at which the luminosity is measured, therefore these types of coatings have an unexpectedly high haze reading. Using a measurement angle which is closer to the region adjacent to the haze angle has proven successful in providing compatible readings on solid colours and also compensating for directional reflection from metallic coatings and speciality pigments
Applications
Generally measurement of reflection haze is confined to high gloss paints and coatings and highly polished metals. Although there has been some degree of success using this measurement method for films it has proven unreliable due to variability caused by changes in the film thickness (internal refraction variations) and the background colour on which the film sample is placed. Generally haze measurement of films is performed using a transmission type hazemeter as described hereafter.
Transmission Haze
Light and transparent materials
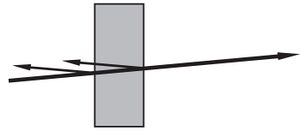
When light strikes the surface of a transparent material the following interactions occur –
• Light is reflected from the front surface of the material
• Some light is refracted within the material (depending on thickness) and reflected from the second surface
• Light passes through the material at an angle which is determined by the refractive index of the material and the angle of illumination.
The light that passes through the transparent material can be affected by irregularities within it; these can include poorly dispersed particles, contaminants (i.e. dust particles) and/or air spaces. This causes the light to scatter in different directions from the normal the degree of which being related to the size and number of irregularities present. Small irregularities cause the light to scatter, or diffuse, in all directions whilst large ones cause the light to be scattered forward in a narrow cone shape. These two types of scattering behaviour are known as Wide Angle Scattering, which causes haze due to the loss of transmissive contrast, and Narrow Angle Scattering a measure of clarity or the "see through quality" of the material based on a reduction of sharpness.
These factors are therefore important for defining the transmitting properties of a transparent material-
Transmission – The amount of light that passes through the material without being scattered
Haze – The amount of light that is subject to Wide Angle Scattering (At an angle greater than 2.5° from normal (ASTM D1003))
Clarity – The amount of light that is subject to Narrow Area Scattering (At an angle less than 2.5° from normal)
Measurement
Measurement of these factors is defined in two International test standards-
ASTM D1003 [4]
ASTM D1003 comprises two test methods:
Procedure A – using a Hazemeter
Procedure B – using a Spectrophotometer
BS EN ISO 13468 Parts 1 and 2 [5]
Part 1 – Using a single beam Hazemeter
Part 2 – Using a dual beam Hazemeter
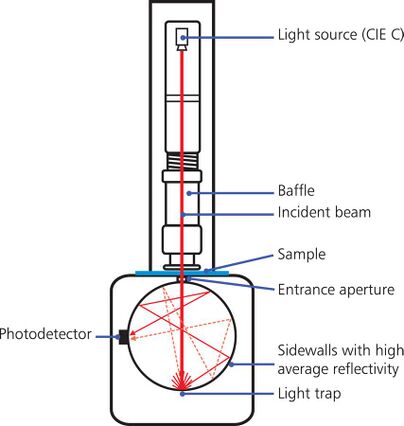
The test methods specify the use of a Hazemeter as shown below -
A collimated beam of light from a light source (ASTM D1003 - Illuminant C, BS EN ISO 13468 Parts 1 and 2 - Illuminant D65 ) passes through a sample mounted on the entrance port of an integrating sphere.
The light, which is uniformly distributed by a matte white highly reflective coating on the sphere walls, is measured by a photodetector positioned at 90° from the entrance port. A baffle mounted between the photodetector and the entrance port prevents direct exposure from the port.
The exit port immediately opposite the entrance port contains a light trap to absorb all light from the light source when no sample is present. A shutter in this exit port coated with the same coating as the sphere walls allows the port to be opened and closed as required.
Total transmittance is measured with the exit port closed.
Transmittance haze is measured with the exit port open.
Commercially available Hazemeters of this type perform both measurements automatically, the only operator interaction being the placement of the sample material on the measurement (entrance) port of the device.
See also
- Gloss (paint)
- Visual appearance
- Distinctness of image
- Transparency meter
References
- ↑ ASTM E430-2011 Standard Test Methods for Measurement of Gloss of High-Gloss Surfaces by Abridged Goniophotometry
- ↑ ASTM D4039–09(2015) Standard Test Method for Reflection Haze of High-Gloss Surfaces
- ↑ ISO 13803:2014 (Paints and varnishes – Determination of haze on paint films at 20 degrees)
- ↑ ASTM ASTM D1003 Standard Test Method for Haze and Luminous Transmittance of Transparent Plastics
- ↑ BS EN ISO 13468 Plastics -- Determination of the total luminous transmittance of transparent materials
External links
 |


