Engineering:Honing (metalworking)
Honing is an abrasive machining process that produces a precision surface on a metal workpiece by scrubbing an abrasive grinding stone or grinding wheel against it along a controlled path. Honing is primarily used to improve the geometric form of a surface, but can also improve the surface finish.
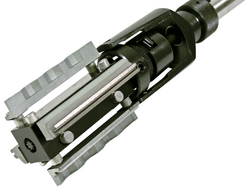
Typical applications are the finishing of cylinders for internal combustion engines, air bearing spindles and gears. There are many types of hones, but all consist of one or more abrasive stones that are held under pressure against the surface they are working on.
Other similar processes are lapping and superfinishing.
Honing stones
Honing uses a special tool, called a honing stone or a hone, to achieve a precision surface. The hone is composed of abrasive grains that are bound together with an adhesive. Generally, honing grains are irregularly shaped and about 10 to 50 micrometers in diameter (300 to 1500 mesh grit). Smaller grain sizes produce a smoother surface on the workpiece.
A honing stone is similar to a grinding wheel in many ways, but honing stones are usually more friable, so that they conform to the shape of the workpiece as they wear in. To counteract their friability, honing stones may be treated with wax or sulfur to improve life; wax is usually preferred for environmental reasons.[1]
Any abrasive material may be used to create a honing stone, but the most commonly used are corundum, silicon carbide, cubic boron nitride, and diamond. The choice of abrasive material is usually driven by the characteristics of the workpiece material. In most cases, corundum or silicon carbide are acceptable, but extremely hard workpiece materials must be honed using superabrasives.[1]
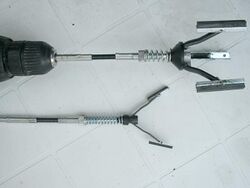
The hone is usually turned in the bore while being moved in and out. Special cutting fluids are used to give a smooth cutting action and to remove the material that has been abraded. Machines can be portable, simple manual machines, or fully automatic with gauging depending on the application.
Modern advances in abrasives have made it possible to remove much larger amount of material than was previously possible. This has displaced grinding in many applications where "through machining" is possible. External hones perform the same function on shafts.
Process mechanics
Since honing stones look similar to grinding wheels, it is tempting to think of honing as a form of low-stock removal grinding. Instead, it is better to think of it as a self-truing grinding process.[2]
In grinding, the wheel follows a simple path. For example, in plunge grinding a shaft, the wheel moves in towards the axis of the part, grinds it, and then moves back out. Since each slice of the wheel repeatedly contacts the same slice of the workpiece, any inaccuracies in the geometric shape of the grinding wheel will be transferred onto the part. Therefore, the accuracy of the finished workpiece geometry is limited to the accuracy of the truing dresser. The accuracy becomes even worse as the grind wheel wears, so truing must occur periodically to reshape it.
The limitation on geometric accuracy is overcome in honing because the honing stone follows a complex path. In bore honing, for example, the stone moves along two paths simultaneously. The stones are pressed radially outward to enlarge the hole while they simultaneously oscillate axially. Due to the oscillation, each slice of the honing stones touch a large area of the workpiece. Therefore, imperfections in the honing stone's profile cannot transfer to the bore. Instead, both the bore and the honing stones conform to the average shape of the honing stones' motion, which in the case of bore honing is a cylinder. This averaging effect occurs in all honing processes; both the workpiece and stones erode until they conform to the average shape of the stones' cutting surface. Since the honing stones tend to erode towards a desired geometric shape, there is no need to true them. As a result of the averaging effect, the accuracy of a honed component often exceeds the accuracy of the machine tool that created it.
The path of the stone is not the only difference between grinding and honing machines, they also differ in the stiffness of their construction. Honing machines are much more compliant than grinders. The purpose of grinding is to achieve a tight size tolerance. To do this, the grinding wheel must be moved to an exact position relative to the workpiece. Therefore, a grinding machine must be very stiff and its axes must move with very high precision.
A honing machine is relatively inaccurate and imperfect. Instead of relying on the accuracy of the machine tool, it relies on the averaging effect between the stone and the workpiece. Compliance is a requirement of a honing machine that is necessary for the averaging effect to occur. This leads to an obvious difference between the two machines: in a grinder the stone is rigidly attached to a slide, while in honing the stone is actuated with pneumatic or hydraulic pressure.
High-precision workpieces are usually ground and then honed. Grinding determines the size, and honing improves the shape.
The difference between honing and grinding is not always the same. Some grinders have complex movements and are self-truing, and some honing machines are equipped with in-process gauging for size control. Many through-feed grinding operations rely on the same averaging effect as honing.
Honing configurations
- Bore honing
- Flat honing
- OD honing / Super Finish / Fine Finish (taper and straight)
- Spherical honing
- Track/raceway honing
Economics
Since honing is a high-precision process, it is also relatively expensive. Therefore, it is only used in components that demand the highest level of precision. It is typically the last manufacturing operation before the part is shipped to a customer. The dimensional size of the object is established by preceding operations, the last of which is usually grinding. Then the part is honed to improve a form characteristic such as surface finish, roundness, flatness, cylindricity, or sphericity.[3]
Performance advantages of honed surfaces
Since honing is a relatively expensive manufacturing process, it can only be economically justified for applications that require very good form accuracy. The improved shape after honing may result in a quieter running or higher-precision component.[3]
The flexible honing tool provides a relatively inexpensive honing process. This tool produces a controlled surface condition unobtainable by any other method. It involves finish, geometry and metallurgical structure. A high-percentage plateau free of cut, torn and folded metal is produced. The flexible hone is a resilient, flexible honing tool with a soft cutting action. The abrasive globules each have independent suspension that assures the tool to be self-centering, self-aligning to the bore, and self-compensating for wear.[citation needed]
Cross-hatch finish
A "cross-hatch" pattern is used to retain oil or grease to ensure proper lubrication and ring seal of pistons in cylinders. A smooth glazed cylinder wall can cause piston ring and cylinder scuffing. The "cross-hatch" pattern is used on brake rotors and flywheels.[citation needed]
Plateau finish
The plateau finish is one characterised by the removal of "peaks" in the metal while leaving the cross-hatch intact for oil retention.[citation needed] The plateaued finish increases the bearing area of the finish and does not require the piston or ring to "break in" the cylinder walls.
Plateau honing specification:[citation needed]
- Rz (10pt Roughness Height)... 3–6 micrometres,
- Rpk (Reduced Peak Height).... ≤0.3 micrometres,
- Rk (Core Roughness Depth).... 0.3–1.5 micrometres,
- Rvk (Reduced Valley Depth)... 0.8–2.0 micrometres.
A profilometer provides modern, defined descriptions of cylinder bore finish that include “RPK” (Reduced Peak Height), “RVK” (Reduced Valley Depth) and “RK” (Core Roughness Depth), which is based on both the “RPK” and “RVK” measurements.
See also
Notes
- ↑ 1.0 1.1 Schibisch, Dirk M.; Friedrich, Uwe (2002). Superfinishing Technology. Germany: verlag moderne industrie. pp. 53–58.
- ↑ King, Robert C.; Hahn, Robert (1986). Handbook of modern grinding technology. New York: Chapman and Hall. pp. 301–336. ISBN 0-412-01081-X.
- ↑ 3.0 3.1 Swigert Jr., Arthur M. (1940). The story of superfinish. Ann Arbor, MI: The Ann Arbor Press. pp. 575–594. OCLC 568009.
 |


