Engineering:Magnetic particle inspection
thumb|A technician performs MPI on a [[pipeline transport|pipeline to check for stress corrosion cracking using what is known as the "black on white" method. No indications of cracking appear in this picture; the only marks are the "footprints" of the magnetic yoke and drip marks.]] thumb|A close-up of the surface of a (different) [[Pipeline transport|pipeline showing indications of stress corrosion cracking (two clusters of small black lines) revealed by MPI. Cracks that would normally have been invisible are detectable due to the magnetic particles clustering at the crack openings. The scale at the bottom is numbered in centimetres.]]
Magnetic particle Inspection (MPI) is a nondestructive testing process where a magnetic field is used for detecting surface, and shallow subsurface, discontinuities in ferromagnetic materials. Examples of ferromagnetic materials include iron, nickel, cobalt, and some of their alloys. The process puts a magnetic field into the part. The piece can be magnetized by direct or indirect magnetization. Direct magnetization occurs when the electric current is passed through the test object and a magnetic field is formed in the material. Indirect magnetization occurs when no electric current is passed through the test object, but a magnetic field is applied from an outside source. The magnetic lines of force are perpendicular to the direction of the electric current, which may be either alternating current (AC) or some form of direct current (DC) (rectified AC).
The presence of a surface or subsurface discontinuity in the material allows the magnetic flux to leak, since air cannot support as much magnetic field per unit volume as metals.
To identify a leak, ferrous particles, either dry or in a wet suspension, are applied to a part. These are attracted to an area of flux leakage and form what is known as an indication, which is evaluated to determine its nature, cause, and course of action, if any.
Types of electrical currents used
There are several types of electrical currents used in magnetic particle inspection. For a proper current to be selected one needs to consider the part geometry, material, the type of discontinuity one is seeking, and how far the magnetic field needs to penetrate into the part.
- Alternating current (AC) is commonly used to detect surface discontinuities. Using AC to detect subsurface discontinuities is limited due to what is known as the skin effect, where the current runs along the surface of the part. Because the current alternates in polarity at 50 to 60 cycles per second it does not penetrate much past the surface of the test object. This means the magnetic domains will only be aligned equal to the distance AC current penetration into the part. The frequency of the alternating current determines how deep the penetration.
- (FWDC) is used to detect subsurface discontinuities where AC can not penetrate deep enough to magnetize the part at the depth needed. The amount of magnetic penetration depends on the amount of current through the part.[1] DC is also limited on very large cross-sectional parts in terms of how effectively it will magnetize the part.
- Half wave DC (HWDC, pulsating DC) works similar to full wave DC, but allows for detection of surface breaking indications and has more magnetic penetration into the part than FWDC. HWDC is advantageous for inspection process as it actually helps move the magnetic particles during the bathing of the test object. The aid in particle mobility is caused by the half-wave pulsating current waveform. In a typical mag pulse of 0.5 seconds there are 15 pulses of current using HWDC. This gives the particle more of an opportunity to come in contact with areas of magnetic flux leakage.
An AC electromagnet is the preferred method for find surface breaking indication. The use of an electromagnet to find subsurface indications is difficult. An AC electromagnet is a better means to detect a surface indication than HWDC, DC, or permanent magnet, while some form of DC is better for subsurface defects.
Equipment
A wet horizontal MPI machine is the most commonly used mass-production inspection machine. The machine has a head and tail stock where the part is placed to magnetize it. In between the head and tail stock is typically an induction coil, which is used to change the orientation of the magnetic field by 90° from the head stock. Most of the equipment is built for a specific application.
Mobile power packs are custom-built magnetizing power supplies used in wire wrapping applications.
Magnetic yoke is a hand-held device that induces a magnetic field between two poles. Common applications are for outdoor use, remote locations, and weld inspection. The drawback of magnetic yokes is that they only induce a magnetic field between the poles, so large-scale inspections using the device can be time-consuming. For proper inspection the yoke needs to be rotated 90 degrees for every inspection area to detect horizontal and vertical discontinuities. Subsurface detection using a yoke is limited. These systems used dry magnetic powders, wet powders, or aerosols.
Demagnetizing parts
After the part has been magnetized it needs to be demagnetized. This requires special equipment that works the opposite way of the magnetizing equipment. The magnetization is normally done with a high current pulse that reaches a peak current very quickly and instantaneously turns off leaving the part magnetized. To demagnetize a part, the current or magnetic field needed has to be equal to or greater than the current or magnetic field used to magnetize the part. The current or magnetic field is then slowly reduced to zero, leaving the part demagnetized. A popular method to record residual magnetism is by using a Gauss meter.[2]
- AC demagnetizing
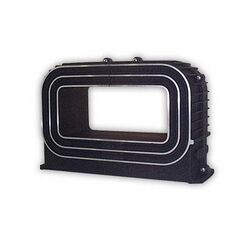
- Pull-through AC demagnetizing coils: seen in the figure to the right are AC powered devices that generate a high magnetic field where the part is slowly pulled through by hand or on a conveyor. The act of pulling the part through and away from the coil's magnetic field slows drops the magnetic field in the part. Note that many AC demagnetizing coils have power cycles of several seconds so the part must be passed through the coil and be several feet (meters) away before the demagnetizing cycle finishes or the part will have residual magnetization.
- AC decaying demagnetizing: this is built into most single phase MPI equipment. During the process the part is subjected to an equal or greater AC current, after which the current is reduced over a fixed period of time (typically 18 seconds) until zero output current is reached. As AC is alternating from a positive to a negative polarity this will leave the magnetic domains of the part randomized.
- AC demag does have significant limitations on its ability to demag a part depending on the geometry and the alloys used.
- Reversing full wave DC demagnetizing: this is a demagnetizing method that must be built into the machine during manufacturing. It is similar to AC decaying except the DC current is stopped at intervals of half a second, during which the current is reduced by a quantity and its direction is reversed. Then current is passed through the part again. The process of stopping, reducing and reversing the current will leave the magnetic domains randomized. This process is continued until zero current is passed through the part. The normal reversing DC demag cycle on modern equipment should be 18 seconds or longer. This method of demag was developed to overcome the limitations presented by the AC demag method where part geometry and certain alloys prevented the AC demag method from working.
- Halfwave DC demagnetizing (HWDC): this process is identical to full-wave DC demagnetization, except the waveform is half-wave. This method of demagnetization is new to the industry and only available from a single manufacturer. It was developed to be a cost-effective method to demagnetize without needing a full-wave DC bridge design power supply. This method is only found on single-phase AC/HWDC power supplies. HWDC demagnetization is just as effective as full-wave DC, without the extra cost and added complexity. Of course, other limitations apply due to inductive losses when using HWDC waveform on large-diameter parts. Also, HWDC effectiveness is limited past 410 mm (16 in) diameter using a 12-volt power supply.
Magnetic particle powder
A common particle used to detect cracks is iron oxide, for both dry and wet systems.
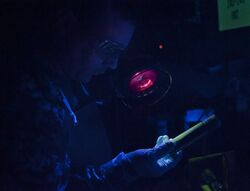
- Wet system particle range in size from less than 0.5 micrometres to 10 micrometres for use with water or oil carriers. Particles used in wet systems have pigments applied that fluoresce at 365 nm (ultraviolet A) requiring 1000 μW/cm2 (10 W/m2) at the surface of the part for proper inspection. If the particles do not have the correct light applied in a darkroom the particles cannot be detected/seen. It is industry practice to use UV goggles/glasses to filter the UV light and amplify the visible light spectrum (normally green and yellow) created by the fluorescing particles. Green and yellow fluorescence was chosen because the human eye reacts best to these colors.
- Dry particle powders range in size from 5 to 170 micrometres, designed to be seen in white light conditions. The particles are not designed to be used in wet environments. Dry powders are normally applied using hand-operated air powder applicators.
- Aerosol applied particles are similar to wet systems, sold in premixed aerosol cans similar to hair spray.
Magnetic particle carriers
It is common industry practice to use specifically designed oil and water-based carriers for magnetic particles. Deodorized kerosene and mineral spirits have not been commonly used in the industry for 40 years.[when?] It is dangerous to use kerosene or mineral spirits as a carrier due to the risk of fire.
Inspection
The following are general steps for inspecting on a wet horizontal machine:
- Workpiece is cleaned of oil and other contaminants.
- Necessary calculations done to know the amount of current required to magnetize the workpiece. Refer ASTM E1444/E1444M for formulas.
- The magnetizing pulse is applied for 0.5 seconds, during which the operator washes the workpiece with the particle, stopping before the magnetic pulse is completed. Failure to stop prior to end of the magnetic pulse will wash away indications.
- UV light is applied while the operator looks for indications of defects that are 0 to ±45 degrees from path the current flowed through the workpiece. Indications only appear 45 to 90 degrees of the magnetic field applied. The easiest way to quickly determine the direction of the magnetic field is running is to grasp the workpiece with either hand between the head stocks laying the thumb against the workpiece (do not wrap the thumb around the workpiece) this is called either left or right thumb rule or right hand grip rule. The direction the thumb points reveals the direction current is flowing. The magnetic field will be running 90 degrees from the current path. On complex geometry, like a crankshaft, the operator needs to visualize the changing direction of the current and magnetic field created. The current starts at 0 degrees then 45 degrees to 90 degree back to 45 degrees to 0 then -45 to -90 to -45 to 0 and this is repeated for each crankpin. Thus, it can be time consuming to find indications that are only 45 to 90 degrees from the magnetic field.
- The workpiece is either accepted or rejected, based on pre-defined criteria.
- The workpiece is demagnetized.
- Depending on requirements, the orientation of the magnetic field may need to be changed 90 degrees to inspect for indications that cannot be detected from steps 3 to 5. The most common way to change magnetic field orientation is to use a "coil shot". In Fig 1 a 36-inch coil can be seen then steps 4, 5, and 6 are repeated.
Standards
- ISO 3059, Non-destructive testing - Penetrant testing and magnetic particle testing - Viewing conditions
- ISO 9934-1, Non-destructive testing - Magnetic particle testing - Part 1: General principles
- ISO 9934-2, Non-destructive testing - Magnetic particle testing - Part 2: Detection media
- ISO 9934-3, Non-destructive testing - Magnetic particle testing - Part 3: Equipment
- ISO 10893-5, Non-destructive testing of steel tubes. Magnetic particle inspection of seamless and welded ferromagnetic steel tubes for the detection of surface imperfections
- ISO 17638, Non-destructive testing of welds - Magnetic particle testing
- ISO 23278, Non-destructive testing of welds - Magnetic particle testing of welds - Acceptance levels
- European Committee for Standardization (CEN)
- EN 1330-7, Non-destructive testing - Terminology - Part 7: Terms used in magnetic particle testing
- EN 1369, Founding - Magnetic particle inspection
- EN 10228-1, Non-destructive testing of steel forgings - Part 1: Magnetic particle inspection
- American Society of Testing and Materials (ASTM)
- ASTM E1444/E1444M Standard Practice for Magnetic Particle Testing
- ASTM A 275/A 275M Test Method for Magnetic Particle Examination of Steel Forgings
- ASTM A456 Specification for Magnetic Particle Inspection of Large Crankshaft Forgings
- ASTM E543 Practice Standard Specification for Evaluating Agencies that Performing Nondestructive Testing
- ASTM E 709 Guide for Magnetic Particle Testing Examination
- ASTM E 1316 Terminology for Nondestructive Examinations
- ASTM E 2297 Standard Guide for Use of UV-A and Visible Light Sources and Meters used in the Liquid Penetrant and Magnetic Particle Methods
- Canadian Standards Association (CSA)
- CSA W59
- Society of Automotive Engineers (SAE)
- AMS 2641 Magnetic Particle Inspection Vehicle
- AMS 3040 Magnetic Particles, Nonfluorescent, Dry Method
- AMS 3041 Magnetic Particles, Nonfluorescent, Wet Method, Oil Vehicle, Ready-To-Use
- AMS 3042 Magnetic Particles, Nonfluorescent, Wet Method, Dry Powder
- AMS 3043 Magnetic Particles, Nonfluorescent, Wet Method, Oil Vehicle, Aerosol Packaged
- AMS 3044 Magnetic Particles, Fluorescent, Wet Method, Dry Powder
- AMS 3045 Magnetic Particles, Fluorescent, Wet Method, Oil Vehicle, Ready-To-Use
- AMS 3046 Magnetic Particles, Fluorescent, Wet Method, Oil Vehicle, Aerosol Packaged5
- AMS 5062 Steel, Low Carbon Bars, Forgings, Tubing, Sheet, Strip, and Plate 0.25 Carbon, Maximum
- AMS 5355 Investment Castings
- AMS I-83387 Inspection Process, Magnetic Rubber
- AMS-STD-2175 Castings, Classification and Inspection of AS 4792 Water Conditioning Agents for Aqueous Magnetic Particle Inspection AS 5282 Tool Steel Ring Standard for Magnetic Particle Inspection AS5371 Reference Standards Notched Shims for Magnetic Particle Inspection
- United States Military Standard
- A-A-59230 Fluid, Magnetic Particle Inspection, Suspension
References
- ↑ Betz, C. E. (1985), Principles of Magnetic Particle Testing, American Society for Nondestructive Testing, p. 234, ISBN 978-0-318-21485-6, http://wiki.magwerks.com/wiki/images/c/c6/Waveform_to_Depth_Comparison.pdf, retrieved 2010-03-02.
- ↑ "What Is MPI (Magnetic Particle Inspection)?". The Graduate Engineer. 2 November 2021. https://thegraduateengineer.com/what-is-mpi-magnetic-particle-inspection/.
Further reading
- "Liquid Penetrant and Magnetic Particle Testing at Level 2". International Atomic Energy Agency. 2000. http://www-pub.iaea.org/MTCD/publications/PDF/TCS-11.pdf.
External links
- Video on Magnetic Particle Inspection, Karlsruhe University of Applied Sciences
 |


