Geometrical Product Specification and Verification
Geometrical Product Specification and Verification (GPS&V)[1] is a set of ISO standards developed by ISO Technical Committee 213.[2] The aim of those standards is to develop a common language to specify macro geometry (size, form, orientation, location) and micro-geometry (surface texture) of products or parts of products so that the language can be used consistently worldwide.
Background
GPS&V standards cover:
- dimensional specifications
- macrogeometrical specifications (form, orientation, location and run-out)
- surface texture specifications
- measuring equipment and calibration requirements
- uncertainty management for measurement and specification acceptance
Other ISO technical committees are strongly related to ISO TC 213. ISO Technical Committee 10[3] is in charge of the standardization and coordination of technical product documentation (DPT).
The GPS&V standards describe the rules to define geometrical specifications which are further included in the DPT. The DPT is defined as the:
The DPT can be either a conventional documentation made of two dimensional Engineering drawings or a documentation based on Computer-aided design (CAD) models with 3RD annotations. The ISO rules to write the documentation are mainly described in ISO 128 and ISO 129[5] series while the rules for 3RD annotations are described in ISO 16792.[6]
ISO Technical Committee 184[7] develops standards that are closely related to GPS&V standards. In particular ISO TC 184/SC4[8] develops ISO 10303 standard known as STEP standard. GPS&V shall not to be confused with the use of ASME Y.14.5 which is often referred to as Geometric Dimension and Tolerance (GD&T).
History and concepts
History
ISO TC 213 was born in 1996 by merging three previous committees:[9]
- ISO Technical Committee 10 Sub-committee 5 (ISO/TC 10/SC5) Geometrical Tolerancing
- ISO Technical Committee 57 (ISO/TC 57) Surface Texture
- ISO Technical Committee 3 (ISO/TC 3) Limits and fits
Operation
GPS&V standards are built on several basic operations defined in ISO 17450-1:2011:[10]
- skin model
- partition
- extraction
- filtration
- association
- collection
- construction
- reconstruction
- reduction
Those operations are supposed to completely describe the process of tolerancing from the point of view of the design and from the point of view of the measurement. They are presented in ISO 17450 standard series. Some of them are further described in other standards e.g ISO 16610 series for filtration. Those concepts are based on academic works.[11] The key idea is to start from the real part with its imperfect geometry (skin model) and then to apply a sequence of well defined operations to completely describe the tolerancing process. The operations are used in the GPS&V standards to define the meaning of dimensional, geometrical or surface texture specifications.
Skin model
The skin model is a representation of the surface of the real part. The model in CAD systems describes the nominal geometry of the parts of a product. The nominal geometry is perfect. However, the geometrical tolerancing has to take into account the geometrical deviations that arise inevitably from the manufacturing process in order to limit them to what is considered as acceptable by the designer for the part and the complete product to be functional. This is why a representation of the real part with geometrical deviations (skin model) is introduced as the starting point in the tolerancing process.
Partition
The skin model is a representation of a whole real part. However, the designer very often, if not always, needs to identify some specific geometrical features of the part to apply well-suited specifications. The process of identifying geometrical features from the skin model or the nominal model is called a partition. The standardization of this operation is a work in progress in ISO TC 213 (ISO 18183 series).
Several methods can be used to obtain a partition from a skin model as described in[12]
Extraction
The skin model and the partitioned geometrical features are usually considered as continuous, however it is often necessary when measuring the part to consider only points extracted from a line or a surface. The process of e.g. selecting the number of points, their distribution over the real geometrical feature and the way to obtain them is part of the extraction operation. This operation is described in ISO 14406:2011[13]
Filtration
Filtration is an operation that is useful to select features of interest from other features in the data. This operation is heavily used for surface texture specifications however, it is a general operation that can be applied to define other specifications. This operation is well known in signal processing where it can be used for example to isolate some specific wave length in a raw signal. The filtration is standardized in ISO 16610 series where a lot of different filters are described.
Association
Association is useful when we need to fit an ideal (perfect) geometrical feature to a real geometrical feature e.g. to find a perfect cylinder that approximates a cloud of points that have been extracted from a real (imperfect) cylindrical geometrical feature. This can be viewed as an mathematical optimization process. A criterion for optimization has to be defined. This criterion can be the minimisation of a quantity such as the squares of the distances from the points to the ideal surface for example. Constraints can also be added such as a condition for the ideal geometrical feature to lie outside the material of the part or to have a specific orientation or location from an other geometrical feature. Different criteria and constraints are used as defaults throughout the GPS&V standards for different purposes such as geometrical specification on geometrical features or datum establishment for example. However, standardization of association as a whole is a work in progress in ISO TC 213.
Collection
Collection is a grouping operation. The designer can define a group of geometrical features that are contributing to the same function. It could be used to group two or more holes because they constitute one datum used for the assembly of a part. It could also be used to group nominally planar geometrical features that are constrained to lie inside the same flatness tolerance zone. This operation is described throughout several GPS&V standards. It is heavily used in ISO 5458:2018 for grouping planar geometrical feature and cylindrical geometrical features (holes or pins). The collection operation can be viewed as applying constraints of orientation and or constraints of location among the geometrical features of the considered group.
Construction
Construction is described as an operation used to build ideal geometrical features with perfect geometry from other geometrical features. An example, given in ISO 17450-1:2011 is the construction of a straight line resulting from the intersection of two perfect planes. No specific standard addresses this operation, however it is used and defined throughout a lot of standards in GPS&V system.
Reconstruction
Reconstruction is an operation allowing the build of a continuous geometrical feature from a discrete geometrical feature. It is useful for example when there is a need to obtain a point between two extracted points as can be the case when identifying a dimension between two opposite points in a particular section in the process of obtaining a linear size of a cylinder. The reconstruction operation is not yet standardized in the GPS&V system however the operation has been described in academic papers[14]
Reduction
Reduction is an operation allowing to compute a new geometrical feature from an existing one. The new geometrical feature is a derived geometrical feature.
Dimensional specification
Dimensional tolerances are dealt with in ISO 14405:
- ISO 14405-1:2016 Linear sizes[15]
- ISO 14405-2:2018 Dimensions other than linear or angular sizes[16]
- ISO 14405-3:2016 Angular sizes[17]
The linear size is indicated above a line ended with arrows and numerical values for the nominal size and the tolerance.The linear size of a geometrical feature of size is defined by default, as the distances between opposite points taken from the surface of the real part.[note 1] The process to build both the sections and the directions needed to identify the opposite points is defined in ISO 14405-1 standard. This process includes the definition of an associated perfect geometrical feature of the same type as the nominal geometrical feature. By default a least-squares criterion is used. This process is defined only for geometrical features where opposite points exist.
ISO 14405-2 illustrates cases where dimensional specification are often misused because opposite points don't exist. In these cases, the use of linear dimensions is considered as ambiguous (see example). The recommendation is to replace dimensional specifications with geometrical specifications to properly specify the location of a geometrical feature with respect to an other geometrical feature, the datum feature (see examples).
Angular sizes are useful for cones, wedges or opposite straight lines. They are defined in ISO 14405-3. The definition implies to associate perfect geometrical features e.g. planes for a wedge and to measure the angle between lines of those perfect geometrical features in different sections. The angular sizes are indicated with an arrow and numerical values for the nominal size and the tolerance. It is to be noted that angular size specification is different from angularity specification. Angularity specification controls the shape of the toleranced feature but it is not the case for angular size specification.
Size of a cylinder
We consider here the specification of a size of a cylinder to illustrate the definition of a size according to ISO 14405-1. The nominal model is assumed to be a perfect cylinder with a dimensional specification of the diameter without any modifiers changing the default definition of size. According to ISO 14405-1:2016 annex D, the process to establish a dimension between two opposite points starting from the real surface of the manufactured part which is nominally a cylinder is as follows:
- partition of the real surface to identify the portion of the whole surface of the part that is submitted to the specification
- extract points from the partitioned surface
- reconstruct the surface from extracted points if the number of extracted points is not infinite
- filter the reconstructed surface
- associate a perfect cylinder to the filtered surface using a least-squares criterion
- identify the straight line which is the axis of the associated cylinder
- built a plane perpendicular to the associated cylinder axis to identify a cross section
- consider the section line which is the intersection of the plane perpendicular to the associated cylinder axis, with the filtered surface
- associate a perfect circle to the section line using a least-squares criterion
- consider a straight line in the cross section passing through the centre of the associated circle
- two opposite points are defined as the intersection between the straight line and the section line
See example hereafter for an illustration.
Dimension with envelope requirement Ⓔ
The envelope requirement is specified by adding the symbol Ⓔ after the tolerance value of a dimensional specification. The symbol Ⓔ modifies the definition of the dimensional specification in the following way (ISO 14405-1 3.8):
- the dimensional specification is applied between two opposite points for the least material side of the dimensional specification,
- the maximum inscribed dimension specification (for internal geometrical feature like a cylindrical hole) or the minimum circumscribed dimension specification (for external geometrical feature like a cylindrical pin) is applied.
The maximum inscribed dimension for a nominally cylindrical hole is defined as the maximum diameter of a perfect cylinder associated to the real surface with a constraint applied to the associated cylinder to stay outside the material of the part. The minimum circumscribed dimension for a nominally cylindrical pin is defined as the minimum diameter of a perfect cylinder associated to the real surface with a constraint applied to the associated cylinder to stay outside the material of the part. See example hereafter for an illustration.
Use of the envelope requirement
The use of the envelope symbol Ⓔ is closely related to the very common function of fitting parts together. A dimensional specification without envelope on the two parts to be fitted is not sufficient to ensure the fitting because the shape deviation of the parts is not limited by the dimensional specifications. The fitting of a cylindrical pin inside a cylindrical hole, for example requires to limit the sizes of both geometrical features but also to limit the deviation of straightness of both geometrical features as it is the combination of the size specification and the geometrical specification (straightness) that will allow the fitting of the two parts.
- The use of the envelope requirement on a cylindrical hole allows to accept only the combinations of size and shape that guarantee a minimum passage for a perfect cylinder.
- The use of the envelope requirement on a cylindrical pin allows to accept only the combinations of size and shape that guarantee that the material of the pin is inside a maximum perfect cylinder.
Then the cylindrical pin and the cylindrical hole will fit even in the worst conditions without over constraining the parts with specific form specifications.
It is to be noted that the use of dimensional size with envelope does not constrain the orientation nor the location of the parts. The use of geometrical specification together with the maximum material requirement (symbol Ⓜ) allows to ensure fitting of parts when additional constraints on orientation or location are required. ISO 2692:2021[18] describes the use of the maximum material modifier.
Form, orientation, location and run-out specifications
GPS&V standards dealing with geometrical specifications are listed below:
- ISO 1101:2017 Tolerances of form, orientation, location and run-out[19]
- ISO 5459:2011 Datums and datum systems[20]
- ISO 5458:2018 Pattern and combined geometrical specification[21]
- ISO 1660:2017 Profile tolerancing[22]
The word geometry, used in this paragraph is to be understood as macrogeometry as opposed to surface texture specifications which are dealt with in other standards.
The main source for geometrical specifications in GPS&V standards is ISO 1101. ISO 5459 can be considered as a companion standard with ISO 1101 as it defines datum which are heavily used in ISO 1101.
ISO 5458 and ISO 1660 are only focussing on subsets of ISO 1101. However, those standards are very useful for the user of GPS&V systems as they cover very common aspects of geometrical tolerancing namely groups of cylinders or planes and profile specifications (lines and surfaces).
A geometrical specification allows to define the three following objects:
- toleranced features
- eventually datums, if they are specified
- tolerance zones
The steps to read a geometrical specification can be summarised as in follows:
- identify the toleranced feature as a portion of the skin model or a feature that can be built from the skin model like an imperfect line representing an axis for example,
- build the specified datum by first associating perfect geometrical features to a (real) datum feature and then building a situation feature from those associated datums to obtain the specified datum,
- build the tolerance zone as a perfect volume or surface that can be constrained in orientation or location from the datum
- check whether the toleranced feature lies entirely inside the tolerance zone.
Toleranced feature
Toleranced features are defined in ISO 1101. The toleranced feature is a real geometrical feature with imperfect geometry identified either directly from the skin model (integral feature) or by a process starting from the skin model (derived feature).
- The integral feature is a portion of the skin model directly identified by a partition with extraction and possibly filtration.
- The derived feature is built from the skin model from a specific process that is defined by default in GPS&V standards. For example, when the axis of a cylinder is indicated by the geometrical specification (see example) then the toleranced feature is a line made of the centres of associated circles in each section. The sections are defined to be perpendicular to the axis of a cylinder associated to the integral feature. The least-squares criterion is used by default.
Whether the toleranced feature is an integral feature or a derived feature depends upon the precise writing of the corresponding specification: if the arrow of the leader line of the specification is in the prolongation of a dimension line otherwise it is an integral feature. A Ⓐ modifier can also be used in the specification to designate a derived feature.
The nominal toleranced feature is a geometrical feature with perfect geometry defined in the TPD corresponding to the toleranced feature.
Datum
Datums are defined in ISO 5459. In essence, the datum is used to link the toleranced feature (imperfect real geometry) to the toleranced zone (perfect geometry). As such the datum object is a three folded object:
- the datum feature is a geometrical feature of imperfect geometry obtained from the skin model (real part) by a partition. The nominal datum is identified on the nominal model by a triangle connected to a frame containing the name of the datum (capital letter),
- the associated datum feature is obtained by associating a geometrical feature with perfect geometry to the datum feature (real). The default process and criterion to be applied for the association is defined in ISO 5459. The criterion can be different for different geometrical features.
- the specified datum is a situation feature built from the associated datums.
The link between the orientation, location or run-out specification and the datums is specified in the geometrical specification frame as follows:
- the primary datum is in the third cell of a geometrical specification, if any;
- the secondary datum is in the forth cell of the geometrical specification, if any;
- the tertiary datum is in the fifth cell of the geometrical specification, if any.
Some geometrical specification may not have any datum section at all (e.g. form specification).
The content of each cell can be either:
- a single datum identified by a capital letter such as 'A' (or several capital letters without separators like 'AA' or 'AAA') or
- a common datum identified by a sequence of capital letters with a dash separator such as A-B (or a sequence of several capital letters separated by dashes like 'AA-BBB').
The process to built a datum system is first described and the process for building a common datum follows.
Datum system
A datum is identified by at most three cells in the geometrical specification frame corresponding to primary, secondary and tertiary datums. For the primary, secondary and tertiary datum, a perfect geometry feature of the same kind[note 2] as the nominal feature is associated to the real feature as described hereafter:
- The primary datum is built by associating a feature of perfect geometry with the default association . In ISO 5459:2011 for a plane, the default association is to minimize the maximum distance between the associated feature (a perfect plane) and the real feature with a constraint for the associated feature to stay outside the material of the part.
- The secondary datum is built in the same way as the primary datum with an additional constraint for the associated feature to be oriented[note 3] from the primary datum as described on the nominal model.
- The tertiary datum is built in the same way as the secondary datum with an additional constraint for the associated feature to be oriented from the secondary datum as described on the nominal model.
The result is a set of associated features. Finally, this set of associated features is used to build a situation feature which is the specified datum.
Common datum
The datum features are identified on the skin model from the datum component in the dash separated list of nominal datum appearing in a particular cell of an orientation or location specification. The common datum can be used as primary, secondary or tertiary datum. In either cases, the process to build a common datum is the same however additional orientation constraints shall be added when the common datum is used as secondary or tertiary datum as is done for datum systems and explained hereafter.
The criterion for association of common datum is applied on all the associated features together with the following constraints:
- external material constraints
- orientation and location constraints between the associated features of the common datum
- addition orientation constraint with respect to preceding datum in the hierarchy.
The result is a set of associated feature. Finally, this set of associated features is used to build a situation feature which is the specified datum.
Situation feature
The final step in the datum establishment process is to combine the associated features to obtain a final object defined as situation feature which is identified to the specified datum (ISO 5459:2011 Table B.1). It is a member of the following set:
- a point
- a straight line
- a plane
- a straight line containing a point
- a plane containing a straight line
- a plane containing a straight line and a point
How to build the situation features and therefore the specified datum, is currently mainly defined through examples in ISO 5459:2011. More specific rules are under development. The specified datum concept is closely related to classes of surfaces invariant through displacements. It has been shown that surfaces can be classified according to the displacements that let them invariant.[23] The number of classes is seven. If a displacement let a surface invariant then this displacement can not be locked by the corresponding specified datum. So the displacement that are not invariant are used to lock specific degrees of freedom of the tolerance zone.
For example a set of associated datums made of three mutually perpendicular planes corresponds to the following situation feature: a plane containing a straight line containing a point. The plane is the first associated plane obtained, the line is the intersection between the second associated plane and the first one and the point is the intersection between the line and the third associated plane. The specified datum is therefore belonging to the complex invariance class ([math]\displaystyle{ \mathbf{C}_\mathbf{X} }[/math]) and all the degrees of freedom of a tolerance zone can be locked with this specified datum.
The invariance class graphic symbols are not defined in ISO standards but only used in literature as a useful reminder. An Helicoidal class ([math]\displaystyle{ \mathbf{C}_\mathbf{H} }[/math]) can also be defined however it is generally replaced with a cylindrical class in real world applications.
Tolerance zone
Tolerance zones are defined in ISO 1101. The tolerance zone is a surface or a volume with perfect geometry. It is a surface when it is intended to contain a toleranced feature which is a line. It is a volume when it is intended to contain a toleranced feature which is a surface It can often be described as a rigid body with the following attributes:
- the shape,[note 4][note 5] is in most cases the volume between two opposite parallel planes (resp. the area between two parallel lines) or a cylinder if the symbol ⌀ is preceding the numerical value in the second section of the geometrical specification frame or a sphere if the symbol S⌀ is used,
- the size, given by a numerical value in the second section of the geometrical specification frame
- orientation constraints with respect to the specified datum from the geometrical specification frame if the geometrical specification is an orientation or a location specification,
- location constraints with respect to the specified datum from the geometrical specification frame if the geometrical specification is a location specification,
- orientation and location constraints between tolerance zones if the modifier CZ ('Combined Zone') is indicated in the second cell of the geometrical specification.
Theoretical Exact Dimension (TED)
TED are identified on a nominal model by dimensions with a framed nominal value without any tolerance. Those dimensions are not specification by themselves but are needed when applying constraints to build datum or to determine the orientation or location of the tolerance zone. TED can also be used for other purposes e.g. to define the nominal shape or dimensions of a profile.
When applying constraints generally two types of TED are to be taken into account:
- explicit TED which are written on an engineering drawing or that may be obtained by querying a CAD model.
- implicit TED which are the distance of 0 mm for two coincident lines, 0° (modulo 180°) for parallel lines or 90° (modulo 180°) for perpendicular lines
Geometrical specification families
The geometrical specifications are divided into three categories:
- form
- orientation
- location
Run-out specification is an other family that involves both form and location.
| family | symbol | meaning | comments |
|---|---|---|---|
| Form | ⏤ | straightness | The nominal toleranced feature is a straight line |
| ⏥ | flatness | The nominal toleranced feature is a plane | |
| ○ | roundness | The nominal toleranced feature is a circle line. | |
| ⌭ | cylindricity | The nominal toleranced feature is a cylindrical surface | |
| ⌒ | profile of a line | The specification containing this symbol is considered as a form specification when no datum are specified. The nominal toleranced feature is a line | |
| ⌓ | profile of a surface | The specification containing this symbol is considered as a form specification when no datum are specified. The nominal toleranced feature is a surface | |
| Orientation | ⫽ | parallelism | The nominal toleranced feature is a plane or a straight line. |
| ⟂ | perpendicularity | The nominal toleranced feature is a plane or a straight line. | |
| ∠ | angularity | The nominal toleranced feature is a plane or a straight line | |
| ⌒ | profile of a line | The specification containing this symbol is considered as an orientation specification when the specified datum is locking only rotational degrees of freedom. A modifier such as 'Orientation Only' (><) can be used to select the orientation constraints only. The toleranced feature is a line | |
| ⌓ | profile of a surface | The specification containing this symbol is considered as an orientation specification when the specified datum is locking only rotational degrees of freedom. A modifier such as 'Orientation Only' (><) can be used to select the orientation constraints only. The toleranced feature is a surface. | |
| Location | ⌖ | position | The nominal toleranced feature is a planar surface or a straight line or a point. |
| ◎ | concentricity | The nominal toleranced feature is a point | |
| ◎ | coaxiality | The nominal toleranced feature is a straight line | |
| ⌯ | symmetry | The nominal toleranced feature is a point, a straight line or a plane. | |
| ⌒ | profile of a line | The specification containing this symbol is considered as a location tolerance when the specified datum is locking rotational and translation degrees of freedom. The nominal toleranced feature is a line. | |
| ⌓ | profile of a surface | The specification containing this symbol is considered as a location tolerance when the specified datum is locking rotational and translation degrees of freedom. The toleranced feature is a surface. | |
| Run-out | ↗ | circular run-out | The nominal toleranced feature is a set of circles. |
| ⌰ | total run-out | The nominal toleranced feature is a plane or a cylinder. |
Examples
Presentation
This paragraph contains examples of dimensional and geometrical specification to illustrate the definition and use of dimensional and positional specifications. The dimensions and tolerance values (displayed in blue in the figures) shall be numerical values on actual drawings. d, l1, l2 are used for length values. Δd is used for a dimensional tolerance value and t, t1, t2 for positional tolerance values. For each example we present:
- the drawing showing the geometry of the nominal model and a specification
- figures illustrating the meaning of the specification on a particular real part with deviations
The deviations are enlarged compared to actual parts in order to show as clearly as possible the steps necessary to build the GPS&V operators. The first angle projection is used in technical drawing.
Dimensional specifications
Diameter of a cylindrical part
 | File:Real part cylinder diameter.svg | 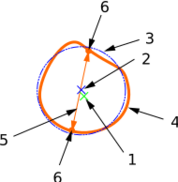 |
| Drawing | Real part | One section of the real part |
|---|
- The drawing above shows a cylindrical part with the specification of the diameter. The nominal value d and the tolerance value Δd shall be replaced with numerical values on an actual drawing.
- The real part above (1) in orange is shown with its deviation. The green lines (2) represent an associated cylinder. The red axis line (3) represents the axis of the associated cylinder. The blue lines (4) represent two particular sections. All sections (an infinite number) shall be considered theoretically. At the verification stage only some sections will be measured introducing uncertainty in the result.
- A section of the real part is represented above with the real line in orange (4). The blue line (3) is an associated circle. The blue cross (2) is the centre of the associated circle. The green cross (1) represents the axis of the associated cylinder shown in green in the real part figure. The two dots (6) represent two opposite points on the real surface. The dimension (5) is one of the local dimension measured.
Diameter of a cylindrical part with envelope Ⓔ
 | 
|
| Drawing | Real part |
|---|
- The drawing shows a cylindrical part with the specification of the diameter with a modifier Ⓔ for the envelope requirement. The nominal value d and the tolerance value Δd shall be replaced with numerical values on an actual drawing.
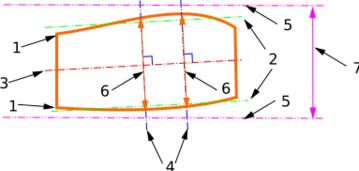
- The real part (1) in orange is shown with its deviation. The green lines (2) represent an associated cylinder. The red axis line (3) represents the axis of the associated cylinder. The blue lines (4) represent two particular sections. All sections shall be considered. The orange dimensions (6) represent dimensions in particular sections. The purple line (5) represents the envelope cylinder (perfect cylinder). The dimension in purple (7) is the dimension of the envelope, specifically d+Δd/2.
The verification is two fold:
- the local dimensions shall be greater than d-Δd,
- the surface of the real part shall fit into the envelope.
Ambiguous dimension
 |  |
| Drawing | Real part |
|---|
- The drawing above shows a part with a dimensional specification. The red cross over this specification means that this type of specification is discouraged in ISO 14405-2 because it is not possible to find opposite points over the complete surface extent. The nominal value d and the tolerance value Δd shall be replaced with numerical values on an actual drawing.
- The real part above in orange is shown with its deviation. The upper dimension (orange) has two opposite points and therefore, could be defined however the lower one is missing an opposite point so that the dimensional specification is considered ambiguous and should be replaced with a geometrical specification.
This example is often surprising for new practitioners of GPS&V. However, it is a direct consequence of the definition of a linear dimension in ISO 14405-1. The function targeted here is probably to locate the two planes, therefore a location specification on one surface with respect to the other surface or the location of the two surfaces with respect to one another is considered the right way to achieve the function. See examples.
Positional specifications
Location of a plane with respect to another plane (case 1)
 |
 |
| Drawing | Real part |
|---|
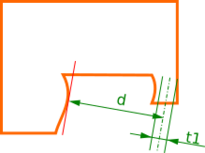
- The drawing above shows a part with a location specification with respect to the datum named A which is indicated on the left planar surface.
- The real part below in orange is shown with its deviation. The process to build or identify the toleranced feature, the specified datum and the tolerance zone is described in the table below.
| Toleranced feature | The toleranced feature is the real surface (orange line segment) corresponding to the plane indicated by the leader line of the specification on the nominal drawing. |
|---|---|
| Specified datum | The red line illustrates the associated datum plane which is the minmax plane with external material constraints as defined per ISO 5459:2011. The specified datum is the same plane as the associated plane in this case. the invariance class of the specified datum is [math]\displaystyle{ \mathbf{C}_\mathbf{P} }[/math] (planar invariance class) |
| tolerance zone | The two green lines illustrates the tolerance zone made of two parallel opposite planes spaced at the value of the tolerance apart. The tolerance value t1 shall be a numerical value in an actual drawing. The tolerance zone is constrained to be parallel to the specified datum and at a distance d coming from the TED indicated on the drawing. The application of the constraints are justified by the use of a positional specification which belongs to the family of location specifications. The rule is to apply as many location and orientation constraints on the tolerance zone with respect to the datum as it is allowed by the specified datum. Three displacements are locked here: one translation and two rotations. |
This specification could be useful when one surface (datum plane in this case) has a higher priority in the assembly process. For example a second part could be required to fit inside the slot being guided by the plane where the datum has been indicated. The part is not conformant to the specification for this particular real part, as the toleranced feature (orange line segment) is not included in the tolerance zone (green).
Location of a plane with respect to another plane (case 2)
 |  |
| Drawing | Real part |
|---|
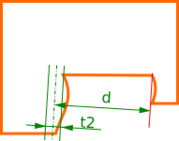
- The drawing above shows a part with a location specification with respect to the datum named A which is indicated on the right planar surface.
- The real part below in orange is shown with its deviation. The process to build or identify the tolerance feature, the specified datum and the tolerance zone is described in the table here after.
| Toleranced feature | The toleranced feature is the real surface (orange line segment) corresponding to the plane indicated by the leader line of the specification on the nominal drawing. |
|---|---|
| Specified datum | The red line illustrates the associated datum plane which is the minmax plane with external material constraints as defined in ISO 5459:2011. The specified datum is the same plane as the associated plane. |
| tolerance zone | The two green lines illustrates the tolerance zone made of two parallel opposite planes spaced of the value of the tolerance apart. The tolerance value t1 shall be a numerical value in an actual drawing. The tolerance zone is constrained to be parallel to the specified datum and at a distance d coming from the Theoretical Exact Dimension (TED) indicated on the drawing. The application of the constrains are justified by the use of a position specification which belongs to the family of location specifications. The rule in this case is to apply as many location and orientation constraints on the tolerance zone with respect to the datum as it is allowed by the datum considering its invariance class, [math]\displaystyle{ \mathbf{C}_\mathbf{P} }[/math] (planar invariance class). Three displacements are locked: one translation and two rotations. |
This case 2 is similar to case 1 above however the toleranced feature and the datum are switched so that the result is totally different as explained above. This specification could be useful when one surface (datum plane) has a higher priority over the other surface in the assembly process. For example a second part could be required to fit inside the slot being guided by the plane where the datum has been indicated. The part is not conformant to the specification for this particular real part, as the toleranced feature (orange line segment) is not included in the tolerance zone (green)
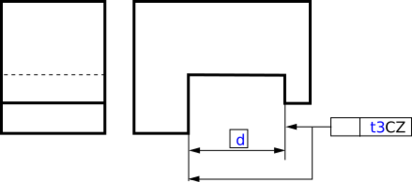
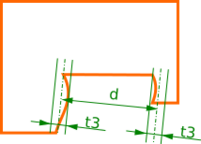
Location of planes with respect to one another (case 3)
 |  |
| Drawing | Real part |
|---|
- The drawing above shows a part with a location specification with a CZ symbol. No datums are indicated on purpose.
- The real part above in orange is shown with its deviation. The building or identification of the toleranced feature and the tolerance zone is described in the table hereafter
| Toleranced feature | The toleranced feature is made of the two line segments (orange) corresponding to the planes indicated by the leader line of the specification on the nominal drawing. |
|---|---|
| Specified datum | No specified datum is defined in this specification |
| tolerance zone | The tolerance zone is made of twice the space between two parallel opposite planes spaced with tolerance value apart. The indication CZ implies that we shall apply location and orientation constraints between the tolerance zones. The value of the constraints are to be taken from the drawing using explicit or implicit theoretical exact dimensions. Therefore, the tolerance zone shall be parallel as indicated on the drawing and at a theoretical distance of d. d shall be a numerical value in an actual drawing. |
This specification could be useful when the two surfaces (plane in this case) have the same priority in the assembly process. For example a second part could be required to fit inside the slot being guided by the two planes. The part is conformant to the specification for this particular real part, as the toleranced feature (two orange line segments) is included in the tolerance zone (green).
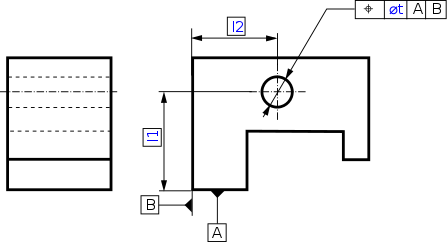
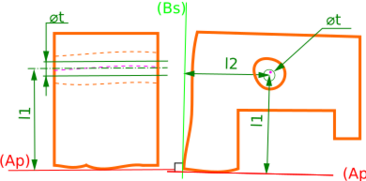
Location of a hole with respect to the edges of a plate
 |  |
| Drawing | Real part |
|---|
- The drawing above shows a part with a location specification for a hole with respect to a system of datums.
- The real part below in orange is shown with its deviation. The process to identify and build the toleranced feature, the specified datum and the tolerance zone is indicated below
| Toleranced feature | The toleranced feature is a derived feature. Broadly speaking the 'real axis of the hole'. It is a line made of the centres of associated circles (least-squares circles) built in each section of the hole. The sections are perpendicular to the axis of the cylinder associated with least-squares criterion to the surface of the hole. |
|---|---|
| Specified datum | The red line illustrates the associated datum A which is the minmax plane with external material constraints. This is the primary datum (Ap) of the datum system. The lime line illustrates the associated secondary datum plane (Bs) which is a minmax plane with external constraints but with an additional constraint of orientation with respect to the primary datum. The orientation constraint has a value of 90° which is the angle between nominal planar surfaces A and B on the drawing. This 90° is considered as an implicit TED and shall be taken into account when building this datum system. The specified datum is then a plane (Ap) and a line (intersection between the primary associated datum Ap and the secondary associated datum Bs). Finally we obtain a specified datum belonging to [math]\displaystyle{ \mathbf{C}_\mathbf{T} }[/math] invariance class. |
| tolerance zone | The tolerance zone is a cylinder because the symbol ⌀ is indicated in the tolerance cell of the geometrical specification frame. The tolerance zone is constrained in location and orientation with respect to the specified datum. Hence the cylinder is parallel to the specified datum and at a location given by the two TEDs l1 and l2 that shall be numerical values in an actual drawing. |
This specification could be useful when the holes is actually located from the edges of the plates in an assembly process and where the A surface has a higher priority over B. If the assembly process is modified then the datum specification shall be adapted in accordance. The order of the datum is important in a datum system as the resulting specified datum can be very different. The part is conformant to the specification for this particular real part, as the toleranced feature (purple line on the left, purple dot on the right) is included in the tolerance zone (green).
Surface texture
- ISO 1302:2002 Indication of surface texture in technical product documentation[24]
Measuring equipment and calibration requirements
- ISO 14978:2018 General concepts and requirements for GPS measuring equipment[25]
- ISO 10360 Acceptance and reverification tests for coordinate measuring machines (CMM)
Uncertainty management for measurement and specification acceptance
- ISO 14253-1:2017 Inspection by measurement of workpieces and measuring equipment - Part 1: Decision rules for verifying conformity or nonconformity with specifications[26]
- ISO 18391:2016 Population specification[27]
Notes
- ↑ This is a major discrepancy between GPS&V standards and GD&T (ASME Y14.5) where the dimensional specification include a limitation on the shape deviation more or less as is done when the envelope requirement Ⓔ is added to the specification in GPS&V standard.
- ↑ A specific modifier CF ('Contacting Feature') can be used for building associated datums of different kinds
- ↑ It is to be noted that the constraint is on orientation and not on location
- ↑ In the case of a surface profile (resp. a line profile) the shape is given by two surfaces (resp. lines) envelope of a sphere (resp. circle) which centre is moving along the nominal model
- ↑ The shape is limited by circles for roundness, circular run-out specifications or cylinders for cylindricity or total run-out specifications. See ISO 1101 for more details
References
- ↑ Płowucha, Wojciech; Jakubiec, Władysław; Humienny, Zbigniew; Hausotte, Tino; Savio, Enrico; Dragomir, Mihai; Bills, Paul; Marxer, Michael et al. (2014-04-02). "Geometrical Product Specification and Verification as toolbox to meet up-to-date technical requirements". https://www.researchgate.net/publication/289523268.
- ↑ "ISO/TC 213 Dimensional and geometrical product specifications and verification". https://www.iso.org/committee/54924.html.
- ↑ "ISO/TC 10 Technical product documentation". https://www.iso.org/committee/45986.html.
- ↑ "ISO 10209:2012 Technical product documentation — Vocabulary — Terms relating to technical drawings, product definition and related documentation (11.155)". https://www.iso.org/standard/51183.html.
- ↑ "Technical drawings — Indication of dimensions and tolerances — Part 1: General principles". https://www.iso.org/standard/29015.html.
- ↑ "ISO 16792:2021 Technical product documentation — Digital product definition data practices". https://www.iso.org/standard/73871.html.
- ↑ "ISO ISO/TC 184 Automation systems and integration". 29 March 2022. https://www.iso.org/committee/54110.html.
- ↑ "ISO/TC 184/SC 4 Industrial data". 24 September 2021. https://www.iso.org/committee/54158.html.
- ↑ Macleod, Iain (June 2020). Geometrical Product Specification: the work of ISO/TC 213.
- ↑ "ISO 17450-1:2011 Geometrical product specifications (GPS) — General concepts — Part 1: Model for geometrical specification and verification". https://www.iso.org/standard/53628.html.
- ↑ GEOSPELLING: A Common Language for Geometrical Product Specification and Verification to Express Method Uncertainty, Proceedings of the 8th CIRP Seminar on Computer Aided Tolerancing, Charlotte USA Mathieu, L., Ballu, A., 2003.
- ↑ Anwer, Nabil; Scott, Paul J; Srinivasan, Vijay. "Toward a Classification of Partitioning Operations for Standardization of Geometrical Product Specifications and Verification". 15th CIRP Conference on Computer Aided Tolerancing – CIRP CAT 2018.
- ↑ "ISO 14406:2010 Geometrical product specifications (GPS) — Extraction". https://www.iso.org/standard/24235.html.
- ↑ Qie, Yifan; Anwer, Nabil; Scott, Paul; Jiang, Jane; Srinivasan, Vijay (17 Aug 2020). "Toward a Mathematical Definition of Reconstruction Operation for ISO GPS Standards". Procedia CIRP 92 (16th CIRP Conference on Computer Aided Tolerancing - Charlotte, United States): 152–157. doi:10.1016/j.procir.2020.05.183.
- ↑ "ISO 14405-1:2016 Linear sizes". https://www.iso.org/standard/65202.html?browse=tc.
- ↑ "ISO 14405-2:2018 Dimensions other than linear or angular sizes". https://www.iso.org/standard/75447.html?browse=tc1.
- ↑ "ISO 14405-3:2016 Angular sizes". https://www.iso.org/standard/62308.html?browse=tc.
- ↑ "ISO 2692:2021 Geometrical product specifications (GPS) — Geometrical tolerancing — Maximum material requirement (MMR), least material requirement (LMR) and reciprocity requirement (RPR)". https://www.iso.org/standard/74592.html.
- ↑ "ISO 1101:2017 Tolerances of form, orientation, location and run-out". https://www.iso.org/standard/66777.html?browse=tc.
- ↑ "ISO 5459:2011 Datums and datum systems". https://www.iso.org/standard/40358.html?browse=tc.
- ↑ "ISO 5458:2018 Pattern and combined geometrical specification". https://www.iso.org/standard/65559.html?browse=tc.
- ↑ "ISO 1660:2017 Profile tolerancing". https://www.iso.org/standard/63218.html?browse=tc.
- ↑ Clément, André; Rivière, Alain; Temmerman, Michel (1994). Cotation tridimensionnelle des systèmes mécaniques - Théorie et pratique. PYC Edition. p. 56. ISBN 2-85330-132-X.
- ↑ "ISO 1302:2002 Indication of surface texture in technical product documentation". https://www.iso.org/standard/28089.html?browse=tc.
- ↑ "ISO 14978:2018 General concepts and requirements for GPS measuring equipment". https://www.iso.org/standard/71148.html?browse=tc.
- ↑ "ISO 14253-1:2017 Inspection by measurement of workpieces and measuring equipment - Part 1: Decision rules for verifying conformity or nonconformity with specifications". https://www.iso.org/standard/70137.html?browse=tc.
- ↑ "ISO 18391:2016 Population specification". https://www.iso.org/standard/62361.html?browse=tc.
External links
 |

