Engineering:Bore gauge
A bore gauge is a collective term for the tools that are unique to the process of accurately measuring holes.
Transfer gauges
Telescopic gauges

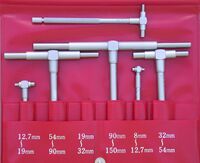
These are a range of gauges that are used to measure a bore's size, by transferring the internal dimension to a remote measuring tool. They are a direct equivalent of inside calipers and require the operator to develop the correct feel to obtain repeatable results.
The gauges are locked by twisting the knurled end of the handles; this action is performed to exert a small amount of friction on the telescopic portions of the gauge (the smaller diameter rods found at the T head of the gauge). To use, the gauge is inserted at a slight angle to the bore and gently locked to a size slightly larger than the bore while at that angle. Then, rocking the handle side-to-side, slowly move the handle across the bore to the other side. The rocking will first align the gauge with the bore axis and the act of moving the handle to the other side of the bore will bring it to the exact bore diameter. This action compresses the two anvils where they remain locked at the bores dimension after being withdrawn.
The gauge is then removed and measured with the aid of a micrometer anvil heads, move the head of the gauge around while making the measurement to ensure you get the maximum reading. Grasp the gauge near the head to aid in your maneuvering of the gauge while adjusting the micrometer so it just stops the gauge's motion at one spot only. A bit of practice will quickly give you the idea.
Small-hole gauges

3 to 5 mm (0.118 to 0.197 in)
5 to 7.5 mm (0.197 to 0.295 in)
7.5 to 10 mm (0.295 to 0.394 in)
10 to 13 mm (0.394 to 0.512 in)
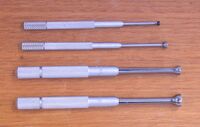
Small-hole gauges require a slightly different technique to the telescopic gauges, the small hole gauge is initially set smaller than the bore to be measured. It is then inserted into the bore and adjusted by rotating the knurled knob at the base, until light pressure is felt when the gauge is slightly moved in the bore. The gauge is then removed and measured with a caliper or micrometer. To accurately detect the maximal distance between the two halves of the gauge head, move the head of the gauge around while making the measurement to ensure you get the maximal reading. Grasp the gauge near the head to aid in your maneuvering of the gauge while adjusting the micrometer so it just stops the gauge's motion at one spot only. A bit of practice will quickly give you the idea.
There are two styles of small-hole gauges: full-ball and half-ball. The full-ball gauges are easier to set correctly and maintain, under the pressure of measurement, a better representation of the bore. Half-ball gauges tend to spring just a little bit, and this may be enough to make a measurement incorrect. A lighter "touch" is required to accurately use the half-ball gauges.
Beam gauges for larger diameters
To measure larger diameters, you may use extended beam gauges. It is designed to measure internal and external diameters. The major challenge is handling these gauges is slightly difficult compared to other bore gauges. It should be lightweight, have low coefficient of thermal expansion, high modulus and stiffness (for example: carbon fibre or aluminium). It has stem with ball at both ends. The length range of the stem depends upon the width of the part. If you want to measure the diameter set the gauges required diameter with master.[clarify] In order to measure the diameter of the bore, place the beam at one end and slide the other end on the diameter and watch the dial indicator. The values initially increases and at one point starts decreasing; stop that point, it is called max point on the circle. That is the diameter of the component. Repeat the procedure in 3 different places and get the average value of the diameter of the component. This is the most common way to measure the larger bore. It is available in different ranges; normally you can use this from 300 mm to 4000 mm for external diameter.
Inside Micrometer
An inside micrometer or vernier bore gauge measures a bore directly. The gauge has three symmetrical anvils that protrude from the gauge body that are connected to the dial or micrometer mechanism. As the knob is rotated it moves the anvils in or out with respect to the measurements. The knob usually has a slipping mechanism to take the feel out of the device and increase reliability between measurements. The measurement given is the mean diameter of the three anvils, and is usually good to 0.001 mm (3.9×10⁻⁵ in).[1]
Dial Bore Gauge
A dial bore gauge is a comparative instrument similar to a telescoping gauge, but includes a digital or analog readout. The dial bore gauge must be set to the nominal value of the bore, and it will measure the variation and direction of the bore from nominal. There are multiple ways to set this gauges to the nominal value. The most common method is using an outside micrometer that is set to the nominal value. This is the quickest and least expensive way to set the dial bore gauge. This method is not the most accurate because there can be high human error and variation in the micrometer is passed down into the dial bore gauge. The more accurate setting options include ring gauges (also called master rings) and designated bore gauge setting equipment that utilize gauge blocks or other standards. When using a micrometer to set a dial bore gauge, the accuracy of the measurement will be 0.002 inches or 0.0508 millimeters. A ring gauge can be used to obtain higher accuracy at a higher cost and higher time requirement. When a dial bore gauge is set using a ring gauge, overall accuracy can be within 0.0001 inches or 0.00254 millimeter.[2]
A dial bore gauge has a contact needle that is housed inside the head of the dial bore gauge. The needle is moved when measuring the bore and mechanically or electronically transfers that data to the dial or readout. The head also includes an interchangeable end that is used to set the nominal size, and reference contacts to aid in alignment with the bore. The interchangeable ends come in varying lengths to accommodate a range of bore sizes. To use this gauge, the operator must first set the gauge to the nominal value of the bore being measured. The dial or digital readout can be zeroed once the nominal measurement is obtained. The head of the gauge is then inserted into the bore that is being measured. Once inserted in the bore, the gauge can be slightly tilted back and forth to produce measurements. The smallest measurement that is displayed on the dial represents when the head is perpendicular to the bore. This will be the accurate measurement in reference to the nominal value that the dial bore gauge was zeroed at. For example, if the gauge was set for a nominal value of 4.000 inches, and the gauge measures 0.002 inches, the size of the bore is 4.002 inches.[citation needed]
Electronic and Wireless Bore Gauges
See also
- Pin gauge
References
- ↑ De Silva, G. M. S. (2002), Basic metrology for ISO 9000 certification, Butterworth-Heinemann, p. 28, ISBN 978-0-7506-5165-3, https://books.google.com/books?id=x_hL3BZBXI8C&lpg=PA28.
- ↑ Schuetz, George (September 2017). "Adjustable Bore Gages". Modern Machine Shop 90 (4): 58, 60. ProQuest 1936137174.
de:Grenzlehre
 |
