Engineering:Lapping
File:Läppmaschine.ogv Lapping is a machining process in which two surfaces are rubbed together with an abrasive between them, by hand movement or using a machine.
Lapping often follows other subtractive processes with more aggressive material removal as a first step, such as milling and/or grinding.
Lapping can take two forms. The first type of lapping (traditionally often called grinding), involves rubbing a brittle material such as glass against a surface such as iron or glass itself (also known as the "lap" or grinding tool) with an abrasive such as aluminum oxide, jeweller's rouge, optician's rouge, emery, silicon carbide, diamond, etc., between them. This produces microscopic conchoidal fractures as the abrasive rolls about between the two surfaces and removes material from both.
The other form of lapping involves a softer material such as pitch or a ceramic for the lap, which is "charged" with the abrasive. The lap is then used to cut a harder material—the workpiece. The abrasive embeds within the softer material, which holds it and permits it to score across and cut the harder material. Taken to a finer limit, this will produce a polished surface such as with a polishing cloth on an automobile, or a polishing cloth or polishing pitch upon glass or steel.
Taken to the ultimate limit, with the aid of accurate interferometry and specialized polishing machines or skilled hand polishing, lensmakers can produce surfaces that are flat to better than 30 nanometers. This is one twentieth of the wavelength of light from the commonly used 632.8 nm helium neon laser light source. Surfaces this flat can be molecularly bonded (optically contacted) by bringing them together under the right conditions. (This is not the same as the wringing effect of Johansson blocks, although it is similar).
Operation

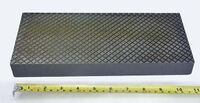
A piece of lead may be used as the lap, charged with emery, and used to cut a piece of hardened steel. The small plate shown in the first picture is a hand lapping plate. That particular plate is made of cast iron. In use, a slurry of emery powder would be spread on the plate and the workpiece simply rubbed against the plate, usually in a "figure-eight" pattern.

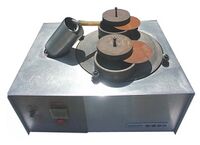
The second picture is of a commercially available lapping machine. The lap or lapping plate in this machine is 30 cm (12 in) in diameter, about the smallest size available commercially. At the other end of the size spectrum, machines with 2.4-to-3.0-metre-diameter (8 to 10 ft) plates are not uncommon, and systems with tables 9 m (30 ft) in diameter have been constructed. Referring to the second picture again, the lap is the large circular disk on the top of the machine. On top of the lap are two rings. The workpiece would be placed inside one of these rings. A weight would then be placed on top of the workpiece. The weights can also be seen in the picture along with two fiber spacer disks that are used to even the load.
In operation, the rings stay in one location as the lapping plate rotates beneath them. In this machine, a small slurry pump can be seen at the side, this pump feeds abrasive slurry onto the rotating lapping plate.

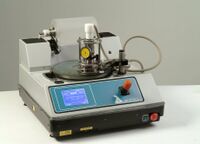
When there is a requirement to lap very small specimens (from 75 mm (3 in) down to a few millimetres), a lapping jig can be used to hold the material while it is lapped (see Image 3, Lapping machine and retention jig). A jig allows precise control of the orientation of the specimen to the lapping plate and fine adjustment of the load applied to the specimen during the material removal process. Due to the dimensions of such small samples, traditional loads and weights are too heavy as they would destroy delicate materials. The jig sits in a cradle on top of the lapping plate and the dial on the front of the jig indicates the amount of material removed from the specimen.
Two-piece lapping
Where the mating of the two surfaces is more important than the flatness, the two pieces can be lapped together. The principle is that the protrusions on one surface will both abrade and be abraded by the protrusions on the other, resulting in two surfaces evolving towards some common shape (not necessarily perfectly flat), separated by a distance determined by the average size of the abrasive particles, with a surface roughness determined by the variation in the abrasive size. This yields closeness-of-fit results comparable to that of two accurately-flat pieces, without quite the same degree of testing required for the latter.

One complication in two-piece lapping is the need to ensure that neither piece flexes or is deformed during the process. As the pieces are moved past each other, part of each (some area near the edge) will be unsupported for some fraction of the rubbing movement. If one piece flexes due to this lack of support, the edges of the opposite piece will tend to dig depressions into it a short distance in from the edge, and the edges of the opposite piece are heavily abraded by the same action - the lapping procedure assumes roughly equal pressure distribution across the whole surface at all times, and will fail in this manner if the workpiece itself deforms under that pressure.
Accuracy and surface roughness
Lapping can be used to obtain a specific surface roughness; it is also used to obtain very accurate surfaces, usually very flat surfaces. Surface roughness and surface flatness are two quite different concepts.
A typical range of surface roughness that can be obtained without resorting to special equipment would fall in the range of 1 to 30 units Ra (average roughness), usually microinches.
Surface accuracy or flatness is usually measured in unit of helium light band (HLB), one HLB measuring about 280 nm (1.1×10⁻⁵ in). Again, without resort to special equipment accuracies of 1 to 3 HLB are typical. Though flatness is the most common goal of lapping, the process is also used to obtain other configurations such as a concave or convex surface.
Measurement
Flatness
The easiest method for measuring flatness is with a height gauge positioned on a surface plate. You must set up the part on three stands and find the minimum variation while adjusting them, just placing the part on the surface plate and using a dial indicator to find TIR on the opposite side of the part measures parallelism. Flatness is more easily measured with a co-ordinate measuring machine. But neither of these methods can measure flatness more accurately than about 2.5 μm (9.8×10⁻⁵ in).

Another method that is commonly used with lapped parts is the reflection and interference of monochromatic light.[1] A monochromatic light source and an optical flat are all that are needed. The optical flat – which is a piece of transparent glass that has itself been lapped and polished on one or both sides – is placed on the lapped surface. The monochromatic light is then shone down through the glass. The light will pass through the glass and reflect off the workpiece. As the light reflects in the gap between the workpiece and the polished surface of the glass, the light will interfere with itself creating light and dark fringes called Newton's rings. Each fringe – or band – represents a change of one half wavelength in the width of the gap between the glass and the workpiece. The light bands display a contour map of the surface of the workpiece and can be readily interpreted for flatness. In the past the light source would have been provided by a helium-neon lamp or tube, using the neon 632.8 nm line,[citation needed]or mercury vapor green line but nowadays a more common source of monochromatic light is the low pressure sodium lamp.[citation needed] Today, Laser diodes and LEDs are used, both being inexpensive and narrow-band light sources. With semiconductor light sources, blue is an option, having a smaller wavelength than red.
For a more thorough description of the physics behind this measurement technique, see interference.
Roughness
Surface roughness is defined by the minute variations in height of the surface of a given material or workpiece. The individual variances of the peaks and valleys are averaged (Ra value), or quantified by the largest difference from peak-to-valley (Rz). Roughness is usually expressed in microns. A surface that exhibits an Ra of 8 consists of peaks and valleys that average no more than 8 µm over a given distance. Roughness may be also measured by comparing the surface of the workpiece to a known sample. Calibration samples are available usually sold in a set and usually covering the typical range of machining operations from about 125 µm Ra to 1 µm Ra.
Surface roughness is measured with a profilometer, an instrument that measures the minute variations in height of the surface of a workpiece.
See also
- Flat honing – a variation of very fine grinding
- Lapping film - a lapping consumable
- Stropping, which often includes lapping action in its action
- Superfinishing – another micro-scale subtractive finishing operation
- Surface metrology – measuring the effects of such processes
References
- ↑ English, R. E. (1953). "Optical Flats". in Ingalls, Albert G.. Amateur Telescope Making, Book Three. Scientific American. pp. 156–162.
External links
- Mark Irvin, Engis Corporation (February 2011). "Diamond Lapping and Lapping Plate Control". Production Machining (Gardner Publications). http://www.engis.com/pdf/2011ProductionMachiningDiamondLappingandPlateControl.pdf. Retrieved 2011-11-17.
 |
