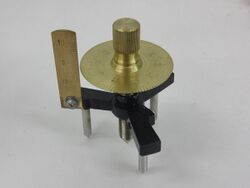
Physics:Spherometer

A spherometer is an instrument used for the precise measurement of the radius of curvature of a curved surface. Originally, these instruments were primarily used by opticians to measure the curvature of the surface of a lens.[1]
Background
The usual form consists of a fine screw moving in a nut carried on the center of a 3 small legged table or frame; the feet forming the vertices of a triangle. The lower end of the screw and those of the table legs are finely tapered and terminate in hemispheres, so that each rests on a point. If the screw has two turns of the thread to the milli metre the head is usually divided into 50 equal parts, so that differences of 0.01 millimeter may be measured without using a vernier. A lens, however, may be fitted, in order to magnify the scale divisions. A vertical scale fastened to the table indicates the number of whole turns of the screw and serves as an index for reading the divisions on the head.
A contact-lever, delicate level or electric contact arrangement may be attached to the spherometer in order to indicate the moment of touching more precisely than is possible by the sense of touch. To measure the radius of a sphere—e.g. the curvature of a lens—the spherometer is leveled and read, then placed on the sphere, adjusted until the four points exert equal pressure, and read again. The difference gives the thickness of that portion of the sphere cut off by a plane passing through the three feet.
Principles of operation
The spherometer directly measures a sagittal, h. Using the mean length between two outer legs, a, the spherical radius R is given by the formula:
Using different spherometer without legs and with circle cup and dial gauge, D is the diameter of circle cup, the spherical radius R is given by the formula:
- Number of divisions on the circular scale = 100 .
- Distance moved by the screw in 10 complete reactions = 10mm .
- PITCH = Distance moved / Number of complete rotations .
- LEAST COUNT = Pitch / Number of divisions on head scale .
- =1/100=0.01 mm.
A spherometer basically is a precision instrument to measure very small lengths. Its name reflects the way it is used to measure the radii of curvature of spherical surfaces. It is based on the principle of screw. In general the spherometer consists of:
- A base circle of three outer legs, a ring, or the equivalent, having a known radius of the base circle. (The outer legs of some spherometers can be moved to a set of inner holes in order to accommodate a smaller surface.)
- A central leg, which can be raised or lowered.
- A reading device for measuring the distance the central leg is moved. On the new spherometer, the vertical scale is marked off in units of 0.5 mm. One complete turn of the dial also corresponds to 0.5 mm and each small graduation on this dial represents 0.005 mm. The small graduations on the old spherometer are 0.001 mm.
Alternative uses
Since the spherometer is essentially a type of micrometer, it can be employed for purposes other than measuring the curvature of a spherical surface. For example, it can be used to measure the thickness of a thin plate.
To do so, the instrument is placed on a perfectly level plane surface and the screw turned until the point just touches; the exact instant when it does so is defined by a sudden diminution of resistance succeeded by a considerable increase. The divided head and scale are read; the screw is raised; the thin plate slipped under it; and the process is repeated. The difference between the two readings gives the required thickness.
Similarly, the instrument can measure the depression in an otherwise flat plate. The method would be as for measuring the thickness of a plate, except that the micrometer portion is placed over the depression and the measurement is taken below the surface instead of above.
This type of instrument is commonly used in inspections of oil field tool pipe for metal surface pits, fractures, and roundness before being shipped to drilling sites for exploratory wells. The process of inspections are designed to remove weakened drill pipe, so that pipe will not fracture during drilling.[2] Tool pipe with thicker than 1" walls for a 4" diameter tube of hardened steel, fitted with tapered thread collars are re-used after drilling is complete, and thinner-walled tubular oil-well casing is in place. Electronic instrumentation similar to the spherometer in design are modified at inspection plants for casing, tubing, and drill pipe. The equivalent measurements in optics would be for a cylinder, or lens with a cylindrical component having an optical axis, where a plane through the lens would produce an oval circumference.
An alternate approach using coordinate geometry was developed recently. This approach reproduces the well-known result for the spherometer and also leads to a scheme to study aspherical surfaces.
A related device is the Cylindrometer (also known as Cylindro-Spherometer and Sphero-Cylindrometer), which can additionally measure the radius of curvature of a right-circular cylinder
See also
- Lapidary
- Lens clock
- Lens (optics)
- Lensometer
References
- ↑
 This article incorporates text from a publication now in the public domain: Chisholm, Hugh, ed (1911). "Spherometer". Encyclopædia Britannica (11th ed.). Cambridge University Press.
- ↑ Anderson, Robert O. (1984). Fundamentals of the Petroleum Industry. Norman, Okla.: University of Oklahoma Press.
External links
 |
