Astronomy:Lunar Panoramic Photography - Apollo 15
NASA's Apollo Lunar Surface Journal (ALSJ)[1] records the details of each mission's period on the lunar surface as a timeline of the activities undertaken, the dialogue between the crew and Mission Control, and the relevant documentary records. Each photograph taken on the mission is catalogued there and each photographic sequence is also recorded. This page tabulates the Apollo 15 panoramas and, where appropriate, provides updated representations of the panoramas blended using more recent technologies than the originals.
Context
Apollo 15 was the first of the Apollo program's "J" Missions[2] which used an enhanced Lunar Module that was capable of supporting a 3-day stay on the lunar surface *and* the delivery of the Lunar Roving Vehicle (LRV or "Rover") to the surface to allow the crew to extend the range of their exploration and to provide remote TV coverage. The crew are recorded as having been particularly enthusiastic[3] about the scientific aspects of the mission and had actively sought additional training by the ground-based scientists in the months leading up to launch. Although the landing site had not been covered by High Resolution photography from the preceding Lunar Orbiter program, the proximity of Hadley Rille,[4] was sufficient for it to be selected. Consequently, the mission's commander, Dave Scott proposed and actioned an additional EVA not long after the landing. This "Stand-up EVA"[5] (SEVA) simply consisted of opening the LM's docking hatch on the top of the vehicle (i.e. not the door used to climb down to the surface) to gain a high vantage point from which to survey the area and assist in the planning of the subsequent EVAs. (This was the only mission to feature an SEVA.)
In terms of photography, Apollo 15's crew proved to be as enthusiastic at that as they were about the science in general; they took a total of 1148 frames whilst on the Moon, a large number of which were components of almost 150 distinct panoramas. These range from seemingly mundane sequences of rock fields for post-mission analysis by teams of geologists, through to spectacular coverage of Hadley Rille and the surrounding mountains. Also, it is worth reminding the reader that, since Digital Photography was still several decades from becoming available, all of the images captured during the lunar missions were recorded on film and post-processed after their return to Earth.
To assist in gaining bearings, the Lunar Module (LM) Falcon, landed with its door and ladder leg (AKA "+Z strut") pointing approximately 20° north of due west. The Sun's elevation[6] was around 13° for the SEVA, 19°-22° for EVA 1, 31°-35° for EVA 2, and 42°-44° for EVA 3.
The higher elevations of the Sun across the EVAs can be seen through the improvement in the quality of the panoramas; the Sun itself, and any resulting lens flair, are barely noticeable whereas they featured prominently in the proceeding missions.
Non-EVA (LM-based) panoramas
As mentioned above, Apollo 15 was the only mission to feature a Stand-up EVA (SEVA).
| Mission | Time (MET) | EVA # | Location | Astronaut | Magazine | Type | Start Frame | End Frame | Alternate Panorama | Source | Reference Panorama | ALSJ Alternate | Notes |
|---|---|---|---|---|---|---|---|---|---|---|---|---|---|
| XV | 106:53:45 | SEVA | Black & White SEVA Pan | Scott | 85 | Monochrome | 11353 | 11382 | N/A | ALSJ |  |
This image featured in Appendix D of the Apollo 15 Preliminary Science Report.[7] | |
| XV | 106:53:45 | SEVA | Black & White SEVA Pan 1 HR North | Scott | 85 | Monochrome | 11355 | 11362 | N/A | ALSJ |  |
||
| XV | 106:53:45 | SEVA | Black & White SEVA Pan 1 HR East | Scott | 85 | Monochrome | 11363 | 11371 | N/A | ALSJ |  |
Note that the Sun features in the centre of this image. Since Falcon landed with its door (and hence windows) facing west (see above) this is the only non-EVA image in the entire Apollo program where the Sun appears (none of the other landings featured an SEVA). | |
| XV | 106:53:45 | SEVA | Black & White SEVA Pan 1 HR South | Scott | 85 | Monochrome | 11363 | 11371 | N/A | ALSJ |  |
||
| XV | 106:56:54 | SEVA | SEVA 500-mm Pan of Hill 305 | Scott | 84 | Monochrome | 11239 | 11241 | N/A | ALSJ |  |
 |
|
| XV | 106:56:54 | SEVA | SEVA 500-mm Portrait of Pluton Crater | Scott | 84 | Monochrome | 11242 | 11243 | N/A | ALSJ |  |
||
| XV | 106:56:54 | SEVA | SEVA 500-mm Portrait of Chain Crater | Scott | 84 | Monochrome | 11244 | 11246 | N/A | ALSJ |  |
||
| XV | 106:57:25 | SEVA | SEVA 500-mm Pan of a northern portion of Hill 305 | Scott | 84 | Monochrome | 11247 | 11249 | N/A | ALSJ |  |
||
| XV | 106:58:07 | SEVA | SEVA 500-mm Pan of Silver Spur HR | Scott | 84 | Monochrome | 11250 | 11253 | N/A | ALSJ |  |
||
| XV | 106:58:27 | SEVA | SEVA Color Pan | Scott | 87 | Colour | 11730 | 11758 | N/A | ALSJ |  |
This image featured in Appendix D of the Apollo 15 Preliminary Science Report. | |
| XV | 106:58:27 | SEVA | SEVA Color Pan Hadley Silver | Scott | 87 | Colour | 11747 | 11751 | N/A | ALSJ |  |
||
| XV | 106:58:27 | SEVA | SEVA Color Pan HR North | Scott | 87 | Colour | 11732 | 11743 | N/A | ALSJ |  |
||
| XV | 106:58:27 | SEVA | SEVA Color Pan HR South | Scott | 87 | Colour | 11746 | 11730 | N/A | ALSJ |  |
||
| XV | 107:31:57 | Pre-EVA | Combined Post-SEVA Window Pan | Scott/Irwin | 85 | Monochrome | 11383 | 11397 | N/A | ALSJ | thumb | This image featured in Appendix D of the Apollo 15 Preliminary Science Report. | |
| XV | 107:31:57 | Pre-EVA | Dave's Post-SEVA Window Pan | Scott | 85 | Monochrome | 11383 | 11393 | N/A | ALSJ |  |
||
| XV | 107:31:57 | Pre-EVA | Jim's Post-SEVA Window Pan | Irwin | 85 | Monochrome | 11394 | 11397 | N/A | ALSJ |  |
||
| XIV | 169:37:47 | Post-EVA-3 | Post-EVA-3 CDR Window Pan | Scott | 88 | Colour | 11931 | 11946 |  |
ALSJ | N/A - Broken link at ALSJ | Alternate generated due to missing original | |
| XIV | 169:37:47 | Post-EVA-3 | Post-EVA-3 LMP Window Pan | Irwin | 88 | Colour | 11947 | 11956 | N/A | ALSJ |  |
||
| XIV | 169:37:47 | Post-EVA-3 | Post-EVA-3 Composite Window Pan | Scott/Irwin | 88 | Colour | 11931 | 11956 | N/A | ALSJ |  |
This image featured in Appendix D of the Apollo 15 Preliminary Science Report. | |
| XIV | 169:37:47 | Post-EVA-3 | First Post-EVA-3 500-mm Pan of the North Complex | Irwin | 88 | Colour | 11204 | 11217 | N/A | ALSJ |  |
 |
|
| XIV | 169:37:47 | Post-EVA-3 | Second Post-EVA-3 500-mm Pan of the North Complex | Irwin | 90 | Monochrome | 12249 | 12256 | N/A | ALSJ |  |
 |
|
| XIV | 169:37:47 | Post-EVA-3 | Post-EVA-3 500-mm | Scott | 90 | Monochrome | 12257 | 12258 | N/A | ALSJ |  |
||
| XIV | 169:37:47 | Post-EVA-3 | Post-EVA-3 500-mm Hill 305 | Scott | 90 | Monochrome | 12259 | 12261 | N/A | ALSJ |  |
||
| XIV | 169:37:47 | Post-EVA-3 | Post-EVA-3 500-mm Mt Hadley Delta | Scott | 90 | Monochrome | 12262 | 12265 | N/A | ALSJ |  |
EVA panoramas - EVA 1
The crew's priority on the first EVA was the deployment of the Lunar Roving Vehicle (LRV) which would enable them to drive rather than walk to remote locations. An added bonus was that the LRV was equipped with a TV camera that could be controlled remotely from Mission Control (unlike the tripod camera they also had); the quicker they got it set up, the quicker pictures would reach the science teams and the public at large. Consequently, they skipped the by-now "traditional" taking of "Tourist Shots" such as descending the ladder and saluting the flag at the beginning of the mission and pushed on to start exploring further afield. It took about 3 hours from exiting the LM to arriving at the first geology 'station' and the first panoramic shots.
| Mission | Time (MET) | EVA # | Location | Astronaut | Magazine | Type | Start Frame | End Frame | Alternate Panorama | Source | Reference Panorama | ALSJ Alternate | Notes |
|---|---|---|---|---|---|---|---|---|---|---|---|---|---|
| XV | 122:14:35 | EVA 1 | Station 1 Pan | Scott | 85 | Monochrome | 11398 | 11415 | N/A | ALSJ |  |
This image featured in Appendix D of the Apollo 15 Preliminary Science Report. | |
| XV | 122:14:35 | EVA 1 | Station 1 Pan - Stereo | Scott | 85 | Monochrome | 11398 | 11407 | N/A | ALSJ |  |
||
| XV | 122:14:35 | EVA 1 | Station 1 Pan - Two-frame down-Sun | Scott | 85 | Monochrome | 11398 | 11399 | N/A | ALSJ |  |
||
| XV | 122:14:35 | EVA 1 | Station 1 Pan - Four frame North | Scott | 85 | Monochrome | 11400 | 11404 | N/A | ALSJ |  |
||
| XV | 122:38:47 | EVA 1 | First Station 2 Pan | Irwin | 85 | Monochrome | 11422 | 11438 | N/A | ALSJ |  |
This image featured in Appendix D of the Apollo 15 Preliminary Science Report. | |
| XV | 122:38:47 | EVA 1 | First Station 2 Pan - Up-Rille | Irwin | 85 | Monochrome | 11422 | 11427 | N/A | ALSJ |  |
Sub-panorama | |
| XV | 122:38:47 | EVA 1 | First Station 2 Pan - Glass Boulder | Irwin | 85 | Monochrome | 11435 | 11438 | N/A | ALSJ |  |
Sub-panorama | |
| XV | 123:17:15 | EVA 1 | Second Station 2 Pan | Irwin | 85 | Monochrome | 11446 | 11465 | N/A | ALSJ |  |
 |
This image featured in Appendix D of the Apollo 15 Preliminary Science Report. |
| XV | 123:17:15 | EVA 1 | Second Station 2 Pan - Alternate | Irwin | 85 | Monochrome | 11448 | 11454 | N/A | LPI |  |
Sub-panorama | |
| XV | 123:17:15 | EVA 1 | Second Station 2 Pan - Up-rille | Irwin | 85 | Monochrome | 11449 | 11451 | N/A | ALSJ |  |
Sub-panorama | |
| XV | 123:17:15 | EVA 1 | Second Station 2 Pan - Hadley Swann | Irwin | 85 | Monochrome | 11449 | 11455 | N/A | ALSJ |  |
Sub-panorama | |
| XV | 123:19:35 | EVA 1 | Station 2 500-mm Pan of Trophy Point, First Strip | Scott | 84 | Monochrome | 11254 | 11268 | N/A | ALSJ |  |
||
| XV | 123:20:51 | EVA 1 | Station 2 500-mm Pan of Trophy Point, Second Strip | Scott | 84 | Monochrome | 11269 | 11275 | N/A | ALSJ |  |
||
| XV | 123:20:51 | EVA 1 | Station 2 500-mm Pan of Trophy Point, Vertical Strip | Scott | 84 | Monochrome | 11276 | 11283 | N/A | ALSJ |  |
||
| XV | 123:20:51 | EVA 1 | Station 2 500-mm Pan of Trophy Point, Combined | Scott | 84 | Monochrome | 11254 | 11283 | N/A | ALSJ |  |
||
| XV | 123:21:30 | EVA 1 | Station 2 500-mm Shots of the Rille Bottom | Scott | 84 | Monochrome | 11284 | 11288 | N/A | ALSJ |  |
||
| XV | 123:21:30 | EVA 1 | Station 2 500-mm Shots of the Rille Bottom - 1st seq | Scott | 84 | Monochrome | 11284 | 11286 | N/A | ALSJ |  |
||
| XV | 123:21:30 | EVA 1 | Station 2 500-mm Shots of the Rille Bottom - 2nd seq | Scott | 84 | Monochrome | 11287 | 11288 | N/A | ALSJ |  |
||
| XV | 123:45:01 | EVA 1 | Seatbelt Basalt Pan | Scott | 86 | Colour | 11583 | 11587 | N/A | ALSJ |  |
This image featured in Appendix D of the Apollo 15 Preliminary Science Report. | |
| XV | 123:45:12 | EVA 1 | EVA-1 Closeout | Scott | 86 | Colour | 11600 | 11602 |  |
ALSJ |  |
Note colour film magazine, monochrome representation at ALSJ. |
EVA panoramas - EVA 2
It was during the second EVA that Scott discovered what became known as the "Genesis Rock". This anorthosite is believed to be a sample of the Moon's early crust, and the hope of finding something like it had been a major objective during the selection of the site for the mission. Although the ALSJ records the finding of this as a "Panorama", the recorded image is simply a collage of five disjoint images.

| Mission | Time (MET) | EVA # | Location | Astronaut | Magazine | Type | Start Frame | End Frame | Alternate Panorama | Source | Reference Panorama | ALSJ Alternate | Notes |
|---|---|---|---|---|---|---|---|---|---|---|---|---|---|
| XV | 143:38:21 | EVA 2 | Rover Pan | Scott | 85 | Monochrome | 11472 | 11480 | N/A | ALSJ |  |
This image featured in Appendix D of the Apollo 15 Preliminary Science Report. | |
| XV | 143:55:26 | EVA 2 | Station 6 Jim's First Pan | Irwin | 85 | Monochrome | 11481 | 11497 | N/A | ALSJ |  |
This image featured in Appendix D of the Apollo 15 Preliminary Science Report. | |
| XV | 144:14:17 | EVA 2 | Station 6 Jim's Second Pan | Irwin | 85 | Monochrome | 11507 | 11522 | N/A | ALSJ |  |
This image featured in Appendix D of the Apollo 15 Preliminary Science Report. | |
| XV | 144:14:17 | EVA 2 | Station 6 Jim's Second Pan - Portion | Irwin | 85 | Monochrome | 11509 | 11516 | N/A | ALSJ |  |
Sub-panorama | |
| XV | 144:24:17 | EVA 2 | Station 6 Crater Sample Mosaic | Scott | 86 | Monochrome | 11636 | 11640 | N/A | ALSJ | N/A | This is a collage rather than a panorama. Omitted. | |
| XV | 144:46:38 | EVA 2 | Station 6 500-mm Mt. Hadley Summit, First Series | Scott | 84 | Monochrome | 11292 | 11301 |  |
ALSJ |  |
||
| XV | 144:47:51 | EVA 2 | Station 6 500-mm Mt. Hadley Summit, Second Series | Scott | 84 | Monochrome | 11302 | 11308 | N/A | ALSJ | |||
| XV | 144:47:51 | EVA 2 | Station 6 500-mm Vertical Sequence of Mt. Hadley | Scott | 84 | Monochrome | 11309 | 11315 | N/A | ALSJ | |||
| XV | 144:50:48 | EVA 2 | Station 6 500-mm Leading Edge of Swann Mountain | Scott | 84 | Monochrome | 11316 | 11317 | N/A | ALSJ | |||
| XV | 144:50:48 | EVA 2 | Station 6 500-mm Left Flank of Mt. Hadley | Scott | 84 | Monochrome | 11318 | 11322 | N/A | ALSJ | |||
| XV | 144:50:48 | EVA 2 | Station 6 500-mm Mt. Hadley Composite | Scott | 84 | Monochrome | 11292 | 11322 | N/A | ALSJ | |||
| XV | 144:50:48 | EVA 2 | Station 6 500-mm LM and Pluton Crater | Scott | 84 | Monochrome | 11324 | 11325 | N/A | ALSJ | |||
| XV | 144:50:48 | EVA 2 | Station 6 500-mm Lineations | Scott | 84 | Monochrome | 11326 | 11327 | N/A | ALSJ | |||
| XV | 144:50:48 | EVA 2 | Station 6 500-mm Lower Portions of the Left Flank of Mt. Hadley | Scott | 84 | Monochrome | 11328 | 11330 | N/A | ALSJ | |||
| XV | 144:50:48 | EVA 2 | Station 6 500-mm Hill 305 | Scott | 84 | Monochrome | 11331 | 11332 | N/A | ALSJ | |||
| XV | 144:50:48 | EVA 2 | Station 6 500-mm Hadley Rille | Scott | 84 | Monochrome | 11333 | 11335 | N/A | ALSJ | |||
| XV | 144:50:48 | EVA 2 | Station 6 500-mm Hadley Delta Summit Outcrops | Scott | 84 | Monochrome | 11336 | 11346 | N/A | ALSJ | |||
| XV | 144:50:48 | EVA 2 | Station 6 500-mm View to the East | Scott | 84 | Monochrome | 11347 | 11349 | N/A | ALSJ | |||
| XV | 145:07:26 | EVA 2 | Station 6a Pan | Irwin | 90 | Monochrome | 12179 | 12193 | N/A | ALSJ | This image featured in Appendix D of the Apollo 15 Preliminary Science Report. | ||
| XV | 145:07:26 | EVA 2 | Station 6a Pan - Boulder | Irwin | 90 | Monochrome | 12179 | 12193 | N/A | ALSJ | |||
| XV | 145:07:26 | EVA 2 | Station 6a Pan - West | Irwin | 90 | Monochrome | 12179 | 12193 | N/A | ALSJ | N/A | Image missing at ALSJ | |
| XV | 145:07:26 | EVA 2 | Station 6a Pan - East | Irwin | 90 | Monochrome | 12188 | 12193 | N/A | ALSJ | Sub-panorama | ||
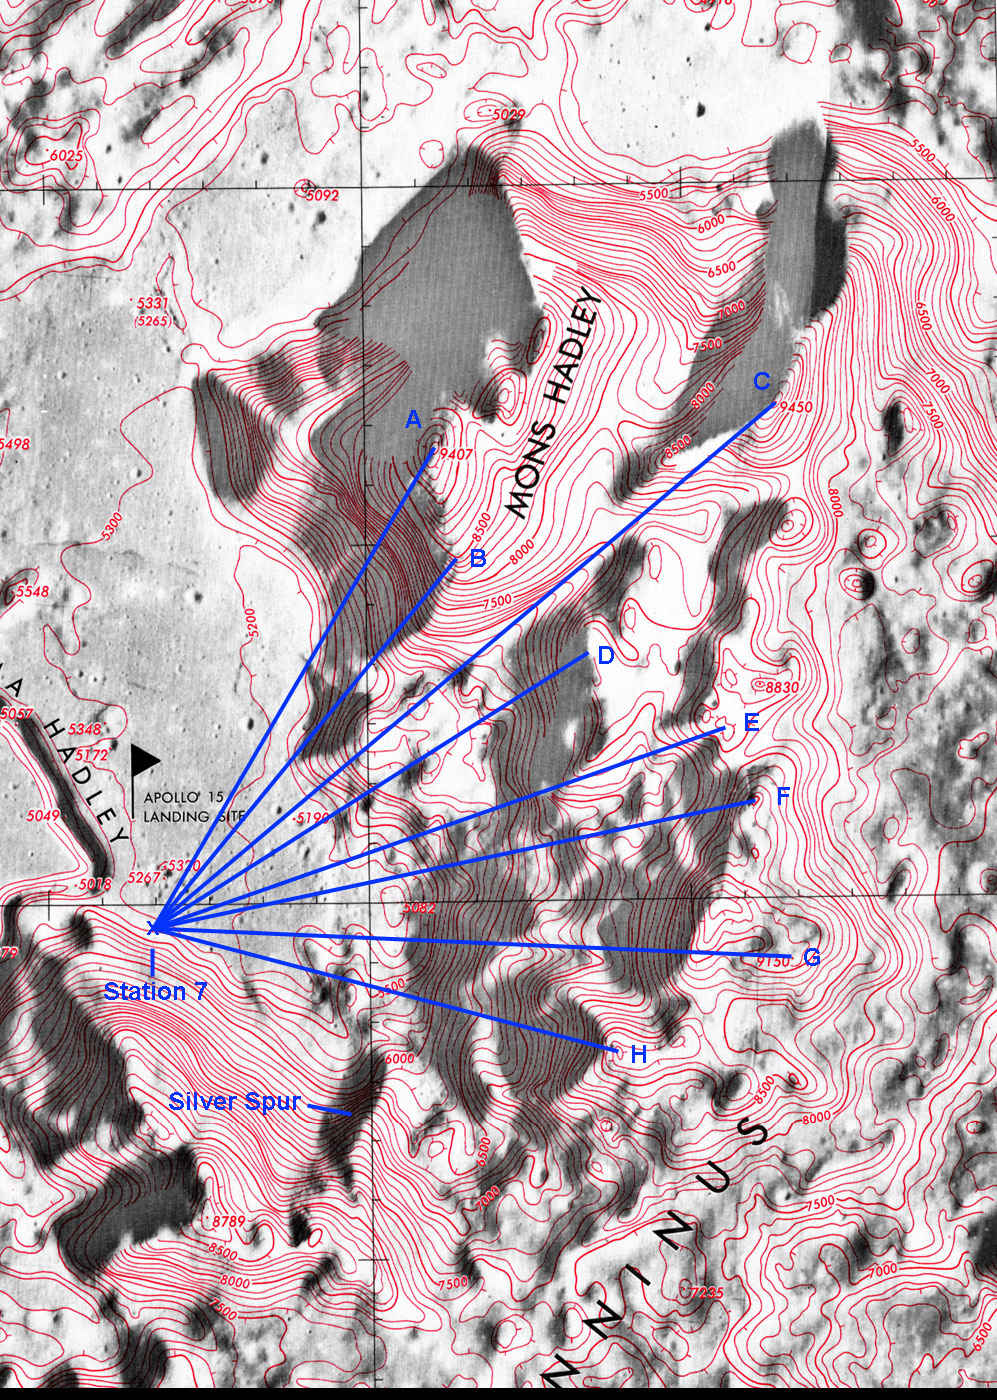
| XV | 145:28:12 | EVA 2 | Station 7 Pan | Irwin | 90 | Monochrome | 12201 | 12222 | N/A | ALSJ | This image featured in Appendix D of the Apollo 15 Preliminary Science Report. | ||
| XV | 145:28:12 | EVA 2 | Station 7 Pan - Eastern Horizon | Irwin | 90 | Monochrome | 12208 | 12212 | N/A | ALSJ | Sub-panorama. Markers can be referenced on this map -
| ||
| XV | 145:28:12 | EVA 2 | Station 7 Pan - Inbound Rover Tracks from Station 6a | Irwin | 90 | Monochrome | 12212 | 12214 | N/A | ALSJ | Sub-panorama | ||
| XV | 145:28:12 | EVA 2 | Station 7 Pan - Rover and Spur Crater | Irwin | 90 | Monochrome | 12217 | 12222 | N/A | ALSJ | Sub-panorama | ||
| XV | 145:34:52 | EVA 2 | Station 7 White Vein Rock | Irwin | 90 | Monochrome | 12224 | ? | N/A | ALSJ | N/A | This is a collage rather than a panorama. Omitted. | |
| XV | 145:42:07 | EVA 2 | Genesis Rock | Irwin | 90 | Monochrome | 12228 | ? | N/A | ALSJ | N/A | This is a collage rather than a panorama. Omitted. | |
| XV | 145:55:13 | EVA 2 | Station 7 Breccia Boulder | Scott | 86 | Monochrome | 11628 | ? | N/A | ALSJ | N/A | This is a collage rather than a panorama. Omitted. | |
| XV | 146:30:33 | EVA 2 | Station 4 Pan | Irwin | 90 | Monochrome | 12237 | 12248 | N/A | ALSJ | This is an unusual entry because ALSJ leads with a sub-panorama and yet the alternate is the complete sequence. This image featured in Appendix D of the Apollo 15 Preliminary Science Report. | ||
| XV | 146:30:33 | EVA 2 | Dune Crater 1 - A15 S71-47077 | Irwin | 90 | Monochrome | 12237 | 12232 | N/A | ALSJ/USGS | Sub-panorama | ||
| XV | 146:30:33 | EVA 2 | Dune Crater 2 - A15 S71-47080 | Irwin | 90 | Monochrome | 12232 | 12248 | N/A | ALSJ/USGS | Sub-panorama | ||
| XV | 147:27:12 | EVA 2 | 12 O'Clock LM Pan at the end of EVA-2 | Irwin | 87 | Colour | 11785 | 11804 | N/A | ALSJ | This image featured in Appendix D of the Apollo 15 Preliminary Science Report. | ||
| XV | 147:27:12 | EVA 2 | 4 O'Clock LM Pan at the end of EVA-2 | Irwin | 87 | Colour | 11805 | 11821 | N/A | ALSJ | This image featured in Appendix D of the Apollo 15 Preliminary Science Report. | ||
| XV | 147:27:12 | EVA 2 | B&W of LM from the Northeast | Irwin | 87 | Monochrome | 11816 | 11820 | N/A | ALSJ | Sub-panorama | ||
| XV | 147:27:12 | EVA 2 | 8 O'Clock LM Pan at the end of EVA-2 | Irwin | 87 | Colour | 11822 | 11840 | N/A | ALSJ | Reverse order. This image featured in Appendix D of the Apollo 15 Preliminary Science Report. | ||
| XV | 147:27:12 | EVA 2 | LM from the southeast | Irwin | 87 | Monochrome | 11835 | 11840 | N/A | ALSJ | Sub-panorama. Reverse Order (11840->11835) | ||
| XV | 147:38:40 | EVA 2 | Jim's ALSEP Pan at the end of EVA-2 | Irwin | 87 | Colour | 11843 | 11858 | N/A | ALSJ | This image featured in Appendix D of the Apollo 15 Preliminary Science Report. | ||
| XV | 147:38:40 | EVA 2 | Jim's ALSEP Pan at the end of EVA-2 - mini-pan | Irwin | 87 | Colour | 11845 | 11847 | N/A | ALSJ | Sub-panorama | ||
| XV | 147:38:40 | EVA 2 | Drilling activities | Irwin | 87 | Monochrome | 11845 | 11849 | N/A | ALSJ | Sub-panorama | ||
| XV | 148:02:20 | EVA 2 | Dave's Station 8 Pan | Scott | 92 | Monochrome | 12420 | 12438 | N/A | ALSJ | Sub-panorama. This image featured in Appendix D of the Apollo 15 Preliminary Science Report. | ||
| XV | 148:02:20 | EVA 2 | Apollo 15 Station 8 | Scott | 92 | Monochrome | 12420 | 12438 | N/A | LPI | thumb | Sub-panorama. Note, this differs to the preceding image; the crop has been shifted upwards and the Réseau plate crosses have been retained. | |
| XV | 148:02:20 | EVA 2 | Station 8 Trench | Scott | 92 | Monochrome | 12424 | 12426 | N/A | ALSJ | N/A | This is a collage rather than a panorama. Omitted. |
EVA panoramas - EVA 3
[So many panoramas were taken during the EVAs that they are better tabulated for each individual EVA]
A large proportion of the EVA 3 panoramas were intended for subsequent geological analysis.
| Mission | Time (MET) | EVA # | Location | Astronaut | Magazine | Type | Start Frame | End Frame | Alternate Panorama | Source | Reference Panorama | ALSJ Alternate | Notes |
|---|---|---|---|---|---|---|---|---|---|---|---|---|---|
| XV | 164:23:13 | EVA 3 | EVA-3 ALSEP Pan No. 1 | Irwin | 88 | Colour | 11878 | 11881 | N/A | ALSJ | |||
| XV | 164:26:56 | EVA 3 | EVA-3 ALSEP Pan No. 2 | Irwin | 82 | Monochrome | 11047 | 11064 | N/A | ALSJ | This image featured in Appendix D of the Apollo 15 Preliminary Science Report. | ||
| XV | 164:26:56 | EVA 3 | EVA-3 ALSEP Pan No. 2 | Irwin | 82 | Monochrome | 11054 | 11058 | N/A | LPI | Sub-Panorama | ||
| XV | 164:26:56 | EVA 3 | EVA-3 ALSEP Pan No. 2 - LM | Irwin | 82 | Monochrome | 11055 | 11057 | ALSJ | Sub-Panorama | |||
| XV | 164:26:56 | EVA 3 | EVA-3 ALSEP Pan No. 2 - Rover | Irwin | 82 | Monochrome | 11059 | 11062 | N/A | ALSJ | Sub-Panorama | ||
| XV | 164:26:56 | EVA 3 | EVA-3 ALSEP Pan No. 2 - Hadley and LM | Irwin | 82 | Monochrome | 11050 | 11057 | N/A | ALSJ | Sub-Panorama | ||
| XV | 165:05:09 | EVA 3 | Station 9 Pan | Scott | 82 | Monochrome | 11066 | 11092 | N/A | ALSJ | This image featured in Appendix D of the Apollo 15 Preliminary Science Report. | ||
| XV | 165:21:16 | EVA 3 | Station 9a Pan | Irwin | 82 | Monochrome | 11110 | 11127 | N/A | ALSJ | |||
| XV | 165:21:16 | EVA 3 | Station 9a Pan | Irwin | 82 | Monochrome | 11110 | 11127 | N/A | LPI | This image featured in Appendix D of the Apollo 15 Preliminary Science Report. | ||
| XV | 165:21:16 | EVA 3 | Station 9a Pan North | Irwin | 82 | Monochrome | 11110 | 11116 | N/A | ALSJ | Sub-Panorama | ||
| XV | 165:21:16 | EVA 3 | Station 9a Pan - Dave at Rover | Irwin | 82 | Monochrome | 11120 | 11126 | N/A | ALSJ | Sub-Panorama | ||
| XV | 165:21:16 | EVA 3 | Station 9a Pan - Dave at work | Irwin | 82 | Monochrome | 11121 | 11122 | N/A | ALSJ | Sub-Panorama | ||
| XV | 165:26:44 | EVA 3 | Station 9a 500-mm Horizontal Strip along West Wall Outcrops | Scott | 89 | Monochrome | 12015 | 12027 | N/A | ALSJ | |||
| XV | 165:27:24 | EVA 3 | Station 9a 500-mm Talus Slope below West Wall Outcrops | Scott | 89 | Monochrome | 12028 | 12044 | N/A | ALSJ | |||
| XV | 165:27:24 | EVA 3 | Station 9a 500-mm West Wall Outcrops, Combined | Scott | 89 | Monochrome | 12028 | 12044 | N/A | ALSJ | |||
| XV | 165:28:46 | EVA 3 | Station 9a 500-mm West Wall Outcrops, First Vertical Strip | Scott | 89 | Monochrome | 12045 | 12048 | N/A | ALSJ | |||
| XV | 165:28:46 | EVA 3 | Station 9a 500-mm West Wall Outcrops, Second Vertical Strip | Scott | 89 | Monochrome | 12049 | 12052 | N/A | ALSJ | |||
| XV | 165:28:46 | EVA 3 | Station 9a 500-mm West Wall Outcrops, Third Vertical Strip | Scott | 89 | Monochrome | 12053 | 12056 | N/A | ALSJ | |||
| XV | 165:29:16 | EVA 3 | Station 9a 500-mm West Wall Crater | Scott | 89 | Monochrome | 12057 | 12062 | N/A | ALSJ | |||
| XV | 165:29:51 | EVA 3 | Station 9a 500-mm Mare Surface west of Hadley Rille | Scott | 89 | Monochrome | 12063 | 12068 | N/A | ALSJ |  |
||
| XV | 165:29:51 | EVA 3 | Station 9a 500-mm Vertical Sequence of Debris-Filled Crater | Scott | 89 | Monochrome | 12069 | 12073 | N/A | ALSJ | |||
| XV | 165:31:38 | EVA 3 | Station 9a 500-mm, West Wall Boulders | Scott | 89 | Monochrome | 12075 | 12078 | N/A | ALSJ | |||
| XV | 165:31:38 | EVA 3 | Station 9a 500-mm, Debris-Filled Crater to Trophy Point - Extended | Scott | 89 | Monochrome | 12047 | 12086 | N/A | ALSJ | (Best description is at ALSJ timeline https://www.nasa.gov/history/alsj/a15/a15.rille.html#1653138 ) | ||
| XV | 165:35:02 | EVA 3 | Station 9a 500-mm, Debris-Filled Crater and Slope Below | Scott | 89 | Monochrome | 12083 | 12086 | N/A | ALSJ | Sub-panorama | ||
| XV | 165:35:02 | EVA 3 | Station 9a East Wall of Hadley Rille | Scott | 89 | Monochrome | 12087 | 12094 | N/A | ALSJ | |||
| XV | 166:18:56 | EVA 3 | Station 10 Jim's Pan | Irwin | 82 | Monochrome | 11165 | 11184 | N/A | ALSJ | This image featured in Appendix D of the Apollo 15 Preliminary Science Report. | ||
| XV | 166:18:56 | EVA 3 | View of the Rille South thru West to North | Irwin | 82 | Monochrome | 11165 | 11184 | N/A | ALSJ | |||
| XV | 166:18:56 | EVA 3 | View to the South Along the Rille | Irwin | 82 | Monochrome | 11174 | 11180 | N/A | ALSJ | Sub-panorama | ||
| XV | 166:18:56 | EVA 3 | Dave Rover | Irwin | 82 | Monochrome | 11165 | 11169 | N/A | ALSJ | Sub-panorama | ||
| XV | 166:18:56 | EVA 3 | West view | Irwin | 82 | Monochrome | 11180 | 11182 | N/A | ALSJ | Sub-panorama | ||
| XV | 166:18:56 | EVA 3 | South view | Irwin | 82 | Monochrome | 11180 | 11182 | N/A | ALSJ | Sub-panorama | ||
| XV | 166:18:56 | EVA 3 | High-resolution portrait of Dave carrying the 500-mm | Irwin | 82 | Monochrome | 11167 | 11168 | N/A | ALSJ | Sub-panorama | ||
| XV | 166:20:51 | EVA 3 | Dave Station 10 500-mm Top of the West Wall Outcrops | Scott | 89 | Monochrome | 12097 | 12116 | N/A | ALSJ | |||
| XV | 166:20:51 | EVA 3 | Dave Station 10 500-mm West Wall Continuation | Scott | 89 | Monochrome | 12117 | 12121 | N/A | ALSJ | |||
| XV | 166:20:51 | EVA 3 | Station 10 500-mm Sequence of the West Wall Crater | Scott | 89 | Monochrome | 12122 | 12126 | N/A | ALSJ | |||
| XV | 166:20:51 | EVA 3 | Station 10 500-mm Sequence of the Mare Surface beyond the West Wall Crater | Scott | 89 | Monochrome | 12127 | 12131 | N/A | ALSJ | |||
| XV | 166:20:51 | EVA 3 | Station 10 500-mm Sequence below the West Wall Crater | Scott | 89 | Monochrome | 12132 | 12136 | N/A | ALSJ | |||
| XV | 166:20:51 | EVA 3 | Station 10 500-mm West Wall Crater, Composite of Horizontal Strips | Scott | 89 | Monochrome | 12122 | 12136 | N/A | ALSJ | |||
| XV | 166:20:51 | EVA 3 | Station 10 500-mm Vertical Strip Through the West Wall Crater | Scott | 89 | Monochrome | 12137 | 12142 | N/A | ALSJ | |||
| XV | 166:20:51 | EVA 3 | Station 10 500-mm Top of the Talus Slope | Scott | 89 | Monochrome | 12143 | 12144 | N/A | ALSJ | |||
| XV | 166:20:51 | EVA 3 | Station 10 500-mm Trophy Point | Scott | 89 | Monochrome | 12145 | 12148 | N/A | ALSJ | |||
| XV | 166:20:51 | EVA 3 | Station 10 500-mm West Wall Crater Composite | Scott | 89 | Monochrome | 12122 | 12148 | N/A | ALSJ | |||
| XV | 166:20:51 | EVA 3 | Station 10 500-mm Vertical Sequence of West Wall | Scott | 89 | Monochrome | 12152 | 12156 | N/A | ALSJ | |||
| XV | 166:20:51 | EVA 3 | Station 10 500-mm Additional Vertical Sequence of West Wall | Scott | 89 | Monochrome | 12157 | 12159 | N/A | ALSJ | |||
| XV | 166:20:51 | EVA 3 | Station 10 500-mm West Wall Outcrops Composite | Scott | 89 | Monochrome | 12097 | 12159 | N/A | ALSJ | |||
| XV | 166:20:51 | EVA 3 | Station 10 500-mm Slope into Hadley Rille from the East Rim | Scott | 89 | Monochrome | 12160 | 12162 | N/A | ALSJ | |||
| XV | 166:41:17 | EVA 3 | EVA-3 Return to LM | Irwin | 82 | Monochrome | 11192 | 11194 | N/A | ALSJ | |||
| XV | 167:10:16 | EVA 3 | EVA-3 Closeout, 500mm, Big Rock Mountain and foreground hill in the Swann Range | Scott | 89 | Monochrome | 12165 | 12171 | N/A | ALSJ |  |
||
| XV | 167:10:16 | EVA 3 | EVA-3 Closeout, 500-mm, Mt Hadley Delta Summit | Scott | 89 | Monochrome | 12173 | 12174 | N/A | ALSJ |  |
||
| XV | 167:10:16 | EVA 3 | EVA-3 Closeout, 500-mm, Left flank of 'leading edge' hill | Scott | 89 | Monochrome | 12172 | 12177 | N/A | ALSJ |  |
||
| XV | 167:48:59 | EVA 3 | VIP Site Pan | Scott | 88 | Colour | 11895 | 11925 |  |
ALSJ | This image featured in Appendix D of the Apollo 15 Preliminary Science Report. | ||
| XV | 167:48:59 | EVA 3 | Rover 'RIP' Pan 1 | Scott | 88 | Colour | 11895 | 11903 | N/A | JSC | https://www.flickr.com/photos/nasa2explore/9356383693/in/photolist-ffMUUe-ffMURn-ffMUWB/ | ||
| XV | 167:48:59 | EVA 3 | Rover 'RIP' Pan 2 | Scott | 88 | Colour | 11904 | 11915 | N/A | JSC | https://www.flickr.com/photos/nasa2explore/9356383527/in/photolist-ffMUUe-ffMURn-ffMUWB/ | ||
| XV | 167:48:59 | EVA 3 | Rover 'RIP' Pan 3 | Scott | 88 | Colour | 11916 | 11925 | N/A | JSC |  |
https://www.flickr.com/photos/nasa2explore/9356383831/in/photolist-ffMUUe-ffMURn-ffMUWB/ |
Key to table columns
- Mission Flight Number
- Time (MET) Time since lift-off (MET - Mission Elapsed Time)
- EVA # Moonwalk number
- Location Title as extracted from source (i.e. ALSJ/LPI)
- Astronaut Who took the images
- Magazine NASA film canister number
- Type Either Colour or Monochrome
- Start Frame First frame of the panoramic sequence
- End Frame Last frame of the panoramic sequence
- Alternate Panorama Unofficial panorama generated by a non-NASA organisation
- Source Where the panorama was sourced from (Typically ALSJ[9] or LPI[10])
- Reference Panorama Image referred to by ALSJ/LPI for the given location
- ALSJ Alternate Alternate image(s) referred to by ALSJ/LPI for the given location
- Notes Additional detail
Post mission analysis
The primary purpose of taking the panoramic images was to provide the context, or placement, of the activities undertaken during the EVAs. The initial analysis was presented in the Apollo 15 Preliminary Science Report. The images continue to be revisited periodically with new, cleaner, representations of the panoramas after being processed by increasingly sophisticated software packages. Examples of these include LPI's Apollo Surface Panorama page,[11] NASA's Johnson Space Center (JSC) 'Anniversary' Panoramas,[12], Mike Constantine's Apollo: The Panoramas[13], and Andy Saunders' Apollo Remastered.[14]
See also
- Lunar Panoramic Photography - Apollo 11
- Lunar Panoramic Photography - Apollo 12
- Lunar Panoramic Photography - Apollo 14
- Lunar Panoramic Photography - Apollo 16
Footnotes
These tables catalogue the panoramic photos captured during the Apollo 15 mission. Entries in the 'Alternate Panorama' column have created using panorama blending software using the High Resolution scans of the original frames held as the "Project Apollo Archive" on Flickr.[15] Where a Reference Panorama is pre-existing, that has been used in preference to creating a new variant, unless there is additional value to be gained by regenerating it. Apart from some source image masking, all such new variants have been created using the minimum of processing, relying on the software package's inherent blending and optimisation capabilities - typically, such panoramas have been created within 3–5 minutes as they are intended to be 'representations' rather than 'definitive' examples. Consequently, brightness and contrast levels, as well as some frame-edges, have not been adjusted.
All 5-digit image references relate to the last 5 digits of the image names. The full image names follow the format AS15-MM-NNNNN, where MM relates to the Magazine number and NNNNN is the identifier.
EVA images include the overlaying of Réseau plate "crosses" to assist in their post-mission evaluation.
All tabular data, such as time and image identifiers, has been extracted from the ALSJ. The entries in the 'Location' column relate to the term used for the panorama as listed in the ALSJ's 'Assembled Panoramas' section.[16]
References
- ↑ "Apollo Lunar Surface Journal". https://www.nasa.gov/history/alsj/.
- ↑ "Apollo Lunar Exploration Missions (ALEM) Program and MIssion Definition". NASA. https://www.lpi.usra.edu/lunar/ALSEP/pdf/31111000672756.pdf.
- ↑ Cokinos, Christopher (26 July 2021). "Go 'behind the mission' of Apollo 15". https://www.astronomy.com/observing/go-behind-the-mission-of-apollo-15/.
- ↑ "Hadley Rille | Moon Valley, Lunar Crater, Apollo 15 | Britannica" (in en). https://www.britannica.com/place/Hadley-Rille.
- ↑ "Apollo 15 Stand-Up EVA" (in en). July 30, 2021. https://svs.gsfc.nasa.gov/4918/.
- ↑ "Sun Angles". https://www.nasa.gov/history/alsj/alsj-sunangles.html.
- ↑ ""Apollo 15 Preliminary Science Report"". https://nasa.gov/wp-content/uploads/static/history/alsj/a15/as15psr.pdf.
- ↑ "Map Apollo 15 Landing Site". https://www.nasa.gov/wp-content/uploads/static/history/alsj/a15/a15LTO12208-12lbl.jpg.
- ↑ "Apollo Lunar Surface Journal". https://www.nasa.gov/history/alsj/main.html.
- ↑ "Lunar and Plantery Institute". https://www.lpi.usra.edu/resources/apollopanoramas/.
- ↑ "LPI (Lunar and Planetary Institute) Apollo Surface Panoramas". https://www.lpi.usra.edu/resources/apollopanoramas/.
- ↑ "Apollo Panoramas" (in en-us). https://www.flickr.com/photos/nasa2explore/albums/72157635384998736/.
- ↑ Constantine, Mike (2015). Apollo: The Panoramas. London: Moonpans.com Ltd. ISBN 978-0993373107.
- ↑ Saunders, Andy (2022). Apollo remastered. Dublin: Particular Books. ISBN 9780241508695.
- ↑ "Project Apollo Archive" (in en-us). https://www.flickr.com/people/projectapolloarchive/.
- ↑ "Apollo 15 Map and Image Library". https://www.nasa.gov/history/alsj/a15/images15.html#Pans.
 |  |


_JSC2007e045378.jpg)