Check sheet
| Check sheet | |
|---|---|
 | |
| One of the Seven Basic Tools of Quality | |
| Purpose | To provide a structured way to collect quality-related data as a rough means for assessing a process or as an input to other analyses |
A check sheet is a form (document) used to collect data in real time at the location where the data is generated. The data it captures can be quantitative or qualitative. When the information is quantitative, the check sheet is sometimes called a tally sheet.[1]
The check sheet is one of the so-called Seven Basic Tools of Quality Control.[2]
Format
The defining characteristic of a check sheet is that data are recorded by making marks ("checks") on it. A typical check sheet is divided into regions, and marks made in different regions have different significance. Data are read by observing the location and number of marks on the sheet.
Check sheets typically employ a heading that answers the Five Ws:
- Who filled out the check sheet
- What was collected (what each check represents, an identifying batch or lot number)
- Where the collection took place (facility, room, apparatus)
- When the collection took place (hour, shift, day of the week)
- Why the data were collected.
Function
Kaoru Ishikawa identified five uses for check sheets in quality control:[3]: 30
- To check the shape of the probability distribution of a process
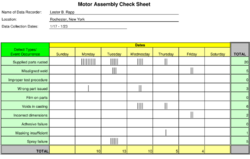
- To quantify defects by type
- To quantify defects by location
- To quantify defects by cause (machine, worker)
- To keep track of the completion of steps in a multistep procedure (in other words, as a checklist)
To assess the shape of a process's probability distribution

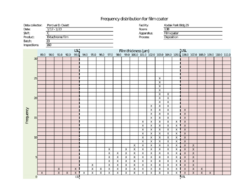
When assessing the probability distribution of a process one can record all process data and then wait to construct a frequency distribution at a later time. However, a check sheet can be used to construct the frequency distribution as the process is being observed.[3]: 31
This type of check sheet consists of the following:
- A grid that captures
- The histogram bins in one dimension
- The count or frequency of process observations in the corresponding bin in the other dimension
- Lines that delineate the upper and lower specification limits
Note that the extremes in process observations must be accurately predicted in advance of constructing the check sheet.
When the process distribution is ready to be assessed, the assessor fills out the check sheet's heading and actively observes the process. Each time the process generates an output, he or she measures (or otherwise assesses) the output, determines the bin in which the measurement falls, and adds to that bin's check marks.
When the observation period has concluded, the assessor should examine it as follows:[3]: 32
- Do the check marks form a bell curve? Are values skewed? Is there more than one peak? Are there outliers?
- Do the check marks fall completely within the specification limits with room to spare? Or are there a significant number of check marks that fall outside the specification limits?
If there is evidence of non-normality or if the process is producing significant output near or beyond the specification limits, a process improvement effort to remove special-cause variation should be undertaken.
For defect type

When a process has been identified as a candidate for improvement, it's important to know what types of defects occur in its outputs and their relative frequencies. This information serves as a guide for investigating and removing the sources of defects, starting with the most frequently occurring.[3]: 32–34
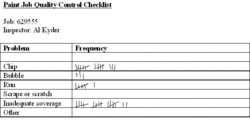
This type of check sheet consists of the following:
- A single column listing each defect category
- One or more columns in which the observations for different machines, materials, methods, operators are to be recorded
Note that the defect categories and how process outputs are to be placed into these categories must be agreed to and spelled out in advance of constructing the check sheet. Additionally, rules for recording the presence of defects of different types when observed for the same process output must be set down.
When the process distribution is ready to be assessed, the assessor fills out the check sheet's heading and actively observes the process. Each time the process generates an output, he or she assesses the output for defects using the agreed-upon methods, determines the category in which the defect falls, and adds to that category's check marks. If no defects are found for a process output, no check mark is made.
When the observation period has concluded, the assessor should generate a Pareto chart from the resulting data. This chart then determines the order in which the process is to be investigated and sources of variation that lead to defects removed.
For defect location
When process outputs are objects for which defects may be observed in varying locations (for example bubbles in laminated products or voids in castings), a defect concentration diagram is invaluable.[3]: 34 Note that while most check sheet types aggregate observations from many process outputs, typically one defect location check sheet is used per process output.
This type of check sheet consists of the following:
- A to-scale diagram of the object from each of its sides, optionally partitioned into equally-sized sections
When the process distribution is ready to be assessed, the assessor fills out the check sheet's heading and actively observes the process. Each time the process generates an output, he or she assesses the output for defects and marks the section of each view where each is found. If no defects are found for a process output, no check mark is made.
When the observation period has concluded, the assessor should reexamine each check sheet and form a composite of the defect locations. Using his or her knowledge of the process in conjunction with the locations should reveal the source or sources of variation that produce the defects.
For defect cause
When a process has been identified as a candidate for improvement, effort may be required to try to identify the source of the defects by cause.[3]: 36
This type of check sheet consists of the following:
- One or more columns listing each suspected cause (for example machine, material, method, environment, operator)
- One or more columns listing the period during which process outputs are to be observed (for example hour, shift, day)
- One or more symbols to represent the different types of defects to be recorded—these symbols take the place of the check marks of the other types of charts.
Note that the defect categories and how process outputs are to be placed into these categories must be agreed to and spelled out in advance of constructing the check sheet. Additionally, rules for recording the presence of defects of different types when observed for the same process output must be set down.
When the process distribution is ready to be assessed, the assessor fills out the check sheet's heading. For each combination of suspected causes, the assessor actively observes the process. Each time the process generates an output, he or she assesses the output for defects using the agreed-upon methods, determines the category in which the defect falls, and adds the symbol corresponding to that defect category to the cell in the grid corresponding to the combination of suspected causes. If no defects are found for a process output, no symbol is entered.
When the observation period has concluded, the combinations of suspect causes with the most symbols should be investigated for the sources of variation that produce the defects of the type noted.
Optionally, the cause-and-effect diagram may be used to provide a similar diagnostic. The assessor simply places a check mark next to the "twig" on the branch of the diagram corresponding to the suspected cause when he or she observes a defect.
Checklist

While the check sheets discussed above are all for capturing and categorizing observations, the checklist is intended as a mistake-proofing aid when carrying out multi-step procedures, particularly during the checking and finishing of process outputs.
This type of check sheet consists of the following:
- An (optionally numbered) outline of the subtasks to be performed
- Boxes or spaces in which check marks may be entered to indicate when the subtask has been completed
Notations should be made in the order that the subtasks are actually completed.[3]: 37
Other types
Check sheets are not limited to those described above. Users should employ their imaginations to design check sheets tailored to the circumstances.[3]: 41
See also
References
- ↑ John R. Schultz (2006). "Measuring Service Industry Performance: Some Basic Concepts". Performance Improvement 45 (4): 3. doi:10.1002/pfi.2006.4930450405.
- ↑ Nancy R. Tague (2004). "Seven Basic Quality Tools". The Quality Toolbox. Milwaukee, Wisconsin: American Society for Quality. p. 15. http://www.asq.org/learn-about-quality/seven-basic-quality-tools/overview/overview.html. Retrieved 2010-02-05.
- ↑ 3.0 3.1 3.2 3.3 3.4 3.5 3.6 3.7 Ishikawa, Kaoru (1986), Guide to Quality Control (2 ed.), Tokyo: Asian Productivity Organization, ISBN 978-92-833-1035-8, OCLC 14169830, https://archive.org/details/guidetoqualityco00ishi
 |
