Engineering:Leak-down tester
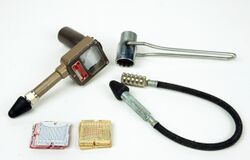
A leak-down tester is a measuring instrument used to determine the condition of internal combustion engines by introducing compressed air into the cylinder and measuring the rate at which it leaks out.
Compression testing is a crude form of leak-down testing which also includes effects due to compression ratio, valve timing, cranking speed, and other factors. Compression tests should normally be done with all spark plugs removed to maximize cranking speed. Cranking compression is a dynamic test of the actual low-speed pumping action, where peak cylinder pressure is measured and stored.

Leak-down testing is a static test. Leak-down tests cylinder leakage paths. Leak-down primarily tests pistons and rings, seated valve sealing, and the head gasket.
Leak-down will not show valve timing and movement problems, or piston movement related sealing problems. Any test should include both compression and leak-down.
Testing is done on an engine which is not running, and normally with the tested cylinder at top dead center on compression, although testing can be done at other points in the compression and power stroke. Pressure is fed into a cylinder via the spark plug hole and the flow, which represents any leakage from the cylinder, is measured. Leak-down tests tend to rotate the engine, and often require some method of holding the crankshaft in the proper position for each tested cylinder. This can be as simple as a breaker bar on a crankshaft bolt in an automatic transmission vehicle, or leaving a manual transmission vehicle in a high gear with the parking brake locked.
Leakage is given in wholly arbitrary percentages but these “percentages” do not relate to any actual quantity or real dimension. The meaning of the readings is only relative to other tests done with the same tester design. Leak-down readings of up to 20% are usually acceptable. Leakages over 20% generally indicate internal repairs are required. Racing engines would be in the 1-10% range for top performance, although this number can vary. Ideally, a baseline number should be taken on a fresh engine and recorded. The same leakage tester, or the same leakage tester design, can be used to determine wear.
In the United States, FAA specifications[1] state that engines up to 1,000 cu in (16 L) engine displacement require an 0.040 in (1.0 mm) orifice diameter, 0.250 in (6.4 mm) long, 60-degree approach angle. The input pressure is set for 80 psi (550 kPa), and 60 psi (410 kPa) minimum cylinder pressure is the accepted standard.
While the leak-down tester pressurizes the cylinder, the mechanic can listen to various parts to determine where any leak may originate. For example, a leaking exhaust valve will make a hissing noise in the exhaust pipe while a head gasket may cause bubbling in the cooling system.
How it works

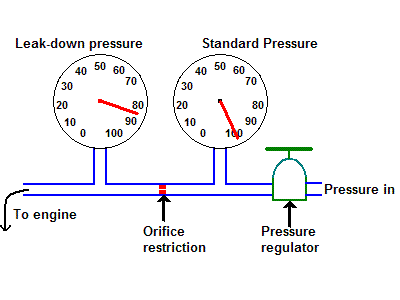
A leak-down tester[2] is essentially a miniature flow meter similar in concept to an air flow bench. The measuring element is the restriction orifice and the leakage in the engine is compared to the flow of this orifice. There will be a pressure drop across the orifice and another across any points of leakage in the engine. Since the meter and engine are connected in series, the flow is the same across both. (For example: If the meter was unconnected so that all the air escapes then the reading would be 0, or 100% leakage. Conversely, if there is no leakage there will be no pressure drop across either the orifice or the leak, giving a reading of 100, or 0% leakage).
Gauge meter faces can be numbered 0-100 or 100-0, indicating either 0% at full pressure or 100% at full pressure.
There is no standard regarding the size of the restriction orifice for non-aviation use and that is what leads to differences in readings between leak-down testers generally available from different manufacturers. Most often quoted though is a restriction with a .040in. hole drilled in it. Some poorly designed units do not include a restriction orifice at all, relying on the internal restriction of the regulator, and give much less accurate results. In addition, large engines and small engines will be measured in the same way (compared to the same orifice) but a small leak in a large engine would be a large leak in a small engine. A locomotive engine which gives a leak-down of 10% on a leak-down tester is virtually perfectly sealed while the same tester giving a 10% reading on a model airplane engine indicates a catastrophic leak.
With a non-turbulent .040" orifice, and with a cylinder leakage effective orifice size of .040", leakage would be 50% at any pressure. At higher leakages the orifice can become turbulent, and this makes flow non-linear. Also, leakage paths in cylinders can be turbulent at fairly low flow rates. This makes leakage non-linear with test pressure. Further complicating things, nonstandard restriction orifice sizes will cause different indicated leakage percentages with the same cylinder leakage. Leak down testers are most accurate at low leakage levels, and the exact leakage reading is just a relative indication that can vary significantly between instruments.
Some manufacturers use only a single gauge. In these instruments, the orifice inlet pressure is maintained automatically by the pressure regulator. A single gauge works well as long as leakage flow is much less than regulator flow. Any error in the input pressure will produce a corresponding error in the reading. As a single gauge instrument approaches 100% leakage, the leakage scale error reaches maximum. This may or may not induce significant error, depending on regulator flow and orifice flow. At low and modest leakage percentages, there is little or no difference between single and dual gauges.
In instruments with two gauges the operator manually resets the pressure to 100 after connection to the engine guaranteeing consistent input pressure and greater accuracy.
Most instruments use 100 psi (690 kPa) as the input pressure simply because ordinary 100psi gauges can be used which corresponds to 100% but there is no necessity for that pressure beyond that. Any pressure above 15 psi (100 kPa) will function just as well for measurement purposes although the sound of leaks will not be quite as loud. Besides leakage noise, indicated percentage of leakage will sometimes vary with regulator pressure and orifice size. With 100 psi and a .030" orifice, a given cylinder might show 20% leakage. At 50 psi, the same cylinder might show 30% leakage or 15% leakage with the same orifice. This happens because leakage flow is almost always very turbulent. Because of turbulence and other factors, such as seating pressures, test pressure changes almost always change the effective orifice formed by cylinder leakage paths.
Metering orifice size has a direct effect on leakage percentage.
Generally, a typical automotive engine pressurized to more than 30-40 psi must be locked or it will rotate under test pressure. The exact test pressure tolerated before rotation is highly dependent on connecting rod angle, bore, compression of other cylinders, and friction. There is less tendency to rotate when the piston is at top dead center, especially with small bore engines. Maximum tendency to rotate occurs at about half stroke, when the rod is at right angles to the crankshaft's throw.
Due to the simple construction, many mechanics build their own testers. Homemade instruments can function as well as commercial testers, providing they employ proper orifice sizes, good pressure gauges, and good regulators.
References
 |
