Physics:Plane strain compression test

The plane strain compression test, also known as the Watts-Ford test, is an engineering test, and is a particularly specialized way of determining some of the material characteristics of the metal being tested, and its specialization can be summarized by this quote:
The test is useful when the sheet pieces are too small for a tensile test of a balanced biaxial test. It can give stress-strain curves up to considerably higher strains than tensile tests.[1]
Plane-strain compression testing is typically used for measuring mechanical properties and for exploring microstructure development in the course of thermomechanical treatment.[2] During the test the specimen is placed between the punches and the constrain plates. When the upper punch is pushed down during the material test, the specimen is extended to horizontal directions. Friction between the tool and the specimen can be reduced by applying lubricants, such as graphite, MoS2, glass or PTFE(Teflon).[3]
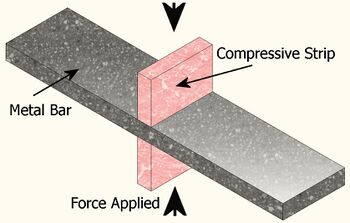
The testing essentially consists of a thin metal bar being compressed by two equally wide compressive strips, which are located of opposite sides of the thin bar. Then, over a range of increasing loads on the bar, the compressive forces lead to the thickness of the metal bar being reduced. This change of thickness is then measured sequentially after each loading, and after some mathematics a stress-strain curve can be plotted.
The advantages of the Watts-Ford test are that it is convenient for testing thin sheets or strips, it is similar to a rolling process (in manufacturing analyses), frictional effects may be minimized, here is no 'barelling' as would occur in a cylindrical compression test, and the plane strain deformation eases the analysis.
Stress-strain curve
The stress-strain curve is the relationship between the stress (force per unit area) and strain (resulting compression/stretching, known as deformation) that a particular material displays;[4] stress–strain curves of various materials differ widely, and different tensile tests conducted on the same material yield different results depending upon the temperature of the specimen and the speed of the loading.[4] When performing Watts-Ford tests, temperatures of the metal specimens will vary from 800-1100 °C and strain rates of (0.01- 10 s-1).[5]
 |
|---|
Pressure
The average pressure on a unit of area of the contact surface between the punch and the specimen is expressed as: P= F/(wb), where F is force, w is the punch width, b is the specimen width.[2]
Citations
- ↑ Handbook of Metallurgical Process Design, By George E. Totten, Kiyoshi Funatani, Lin Xie, CRC Press
- ↑ 2.0 2.1 Drozd, K., Horsinka, J., KLIBER, J., ČERNÝ, M., OSTROUSHKO, D., & MAMUZIC, I. (2011, January). Study of development of strain in plane strain compression test. In Metal 2011.
- ↑ Yabe, S., Terano, M., & Yoshino, M. (2014). Plane strain compression test and simple shear test of single crystal pure iron. Procedia Engineering, 81, 1342-1347.
- ↑ 4.0 4.1 "Stress–strain curve" (in en), Wikipedia, 2019-01-14, https://en.wikipedia.org/w/index.php?title=Stress%E2%80%93strain_curve&oldid=878376070, retrieved 2019-03-15
- ↑ "(PDF) Processing of plane strain compression test results for investigation of AISI-304 stainless steel constitutive behavior" (in en). https://www.researchgate.net/publication/302947751_Processing_of_plane_strain_compression_test_results_for_investigation_of_AISI-304_stainless_steel_constitutive_behavior.
 |
