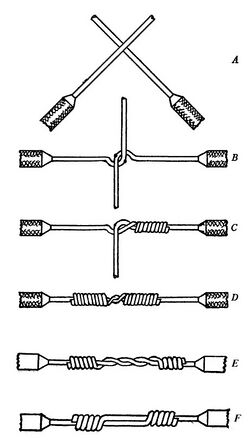
Engineering:Western Union splice

The Western Union splice or Lineman splice is a method of joining electrical cable, developed in the nineteenth century during the introduction of the telegraph and named for the Western Union telegraph company.[3][4] This method can be used where the cable may be subject to loading stress. The wrapping pattern design causes the join to tighten as the conductors pull against each other.[5]
History
In 1915, Practical electric wiring described it as being, "by far the most widely used splice" in practical electrical wiring work.[1] NASA included the splice in its technical standard Workmanship Standard For Crimping, Interconnecting Cables, Harnesses, And Wiring, first produced in 1998.[6][4]
Construction
The 1915 textbook Practical Electric Wiring describes the construction of the Western Union splice; short tie and long tie. The short tie splice has it being formed after stripping the insulation from a pair of wires for several inches, each, crossing the wires left over right as shown in figure part A; then, a hooked cross (figure part B) is formed holding the crossing point of the two wires, and pulling the right wire tip toward and pushing the left wire tip away from the worker, leaving the tips oriented vertically as shown.[1] The wires are then held with pliers to the left of their crossing point while the right splice is formed by continuing to wind the wire tip away from the worker, creating 5–6 twists snug against the core wire and against each preceding twist.[1] NASA recommend "tight, with no gaps between adjacent turns".[5] The wires are then again held with pliers, but on the first-made twist, to the right of the crossing point, and then the left splice is formed by winding the remaining wire tip toward the worker for a comparable 5–6 snug twists.[1] The splice wire ends are then trimmed as needed, and the splice may then be soldered, and/or covered (e.g., with a heat-shrunk tube of insulation).[5]
Practical Electric Wiring described the splice as having two variations, the "short tie" (figure part D) and "long tie" (figure parts E or F), with the latter examples having a "twist between wrappings [that] allows a better chance for solder to pass in between the wires". The book suggested the long tie variant more suited to splices where soldering was intended. However, this was not backed up by NASA testing.[1][7]
Testing
The NASA tests included soldering, and were performed to an organizational standard operating procedure (NASA-STD-8739.3) for a solder termination, which includes a number of specific requirements, including "proper insulation spacing"; tight wrapping; trimming of wire ends to prevent protrusions through the solder; and over-sleeving with a transparent or translucent heat shrink seal to cover the completed splice and all exposed metal.[7]
NASA found both the short and long tie variants to be strong when soldered. The splices were examined in tensile strength ("pull") tests on 16 and 22 American wire gauge wire; even the short tie variation of the Western Union splice performed well after soldering. The test splices never failed at the splice (instead breaking outside of the splice area), leaving NASA to conclude that "the solder connection at the splice was as strong or stronger than the un-spliced wires".[5][7]
See also
References
![]() This article incorporates public domain material from websites or documents of the National Aeronautics and Space Administration.
This article incorporates public domain material from websites or documents of the National Aeronautics and Space Administration.
- ↑ 1.0 1.1 1.2 1.3 1.4 1.5 Sharp, John MacLaren (1915). Practical Electric Wiring. New York and London: D. Appleton and Company. pp. 12–14. https://babel.hathitrust.org/cgi/pt?id=wu.89089723613&view=1up&seq=27.
- ↑ Taken from Figures 1 and 2 of [1] and re-labelled.
- ↑ Lemau (2010-09-26). "Conductor splices". https://www.electricneutron.com/wiring-techniques/conductor-splices/.
- ↑ 4.0 4.1 "How-To: Splice Wire to NASA Standards | Make" (in en). 2012-02-28. https://makezine.com/2012/02/28/how-to-splice-wire-to-nasa-standards/.
- ↑ 5.0 5.1 5.2 5.3 "Western Union/Lineman Splice". NASA Workmanship Technical Committee. http://workmanship.nasa.gov/guidadv_recmeth_wusplice.jsp.
- ↑ "Workmanship Standard For Crimping, Interconnecting Cables, Harnesses, And Wiring". NASA. 2016. p. 71. https://nepp.nasa.gov/files/27631/NSTD87394A.pdf.
- ↑ 7.0 7.1 7.2 "Links To Required Workmanship Standards - NASA interconnection standards (including NASA-STD-8739.4)". NASA. https://nepp.nasa.gov/index.cfm/5544.
 |

