Standard (metrology)
In metrology (the science of measurement), a standard (or etalon) is an object, system, or experiment that bears a defined relationship to a unit of measurement of a physical quantity.[1] Standards are the fundamental reference for a system of weights and measures, against which all other measuring devices are compared. Historical standards for length, volume, and mass were defined by many different authorities, which resulted in confusion and inaccuracy of measurements. Modern measurements are defined in relationship to internationally standardized reference objects, which are used under carefully controlled laboratory conditions to define the units of length, mass, electrical potential, and other physical quantities.
Hierarchy of standards
There is a three-level hierarchy of physical measurement standards. At the top of the tree are the master standards – these are known as primary standards. Primary standards are made to the highest metrological quality and are the definitive definition or realization of their unit of measure.[2] Historically, units of measure were generally defined with reference to unique artifacts which were the legal basis of units of measure. A continuing trend in metrology is to eliminate as many as possible of the artifact standards and instead define practical units of measure in terms of fundamental physical constants, as demonstrated by standardized technique. One advantage of elimination of artifact standards is that inter-comparison of artifacts is no longer required. Another advantage would be that the loss or damage of the artifact standards would not disrupt the system of measures.
The next quality standard in the hierarchy is known as a secondary standard. Secondary standards are calibrated with reference to a primary standard.[2]
The third level of standard, a standard which is periodically calibrated against a secondary standard, is known as a working standard.[2] Working standards are used for the calibration of commercial and industrial measurement equipment.
Primary standards
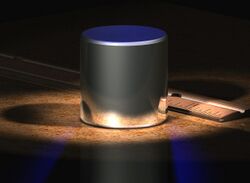
An example of a primary standard was the international prototype of the kilogram (IPK) which was the master kilogram and the primary mass standard for the International System of Units (SI). The IPK is a one kilogram mass of a platinum-iridium alloy maintained by the International Bureau of Weights and Measures (BIPM) in Sèvres, France.
Another example is the unit of electrical potential, the volt. Formerly it was defined in terms of standard cell electrochemical batteries, which limited the stability and precision of the definition. Currently the volt is defined in terms of the output of a Josephson junction,[3] which bears a direct relationship to fundamental physical constants.
In contrast, the reference standard for the metre is no longer defined by a physical object (as the former international prototype of the metre (IPM) or originally the mètre des Archives). In 1983, the standard metre was redefined as the distance light travels in a vacuum during 1/299792458 of a second.[4]
Secondary reference standards
Secondary reference standards are very close approximations of primary reference standards. For example, major national measuring laboratories such as the US's National Institute of Standards and Technology (NIST) will hold several "national standard" kilograms, which are periodically calibrated against the IPK and each other.[5]
Working standards
A machine shop will have physical working standards (gauge blocks for example) that are used for checking its measuring instruments. Working standards and certified reference materials used in commerce and industry have a traceable relationship to the secondary and primary standards.
Working standards are expected to deteriorate, and are no longer considered traceable to a national standard[6] after a time period or use count expires.[7]
Laboratory standards
National organizations provide calibration and private industrial laboratories with items, processes and/or certification so they can provide certified traceability to national standards. (In the United States, NIST operates the NVLAP program.[8]) These laboratory standards are kept in controlled conditions to maintain their precision, and used as a reference for calibration and creating working standards.[9] Sometimes they are (incorrectly) called "secondary standards" because of their high quality and reference suitability.
See also
- History of measurement
- International System of Units
- Measurement
- Measurement uncertainty
- Measuring instrument
- Metre
- Standardization
- Technical standard
- Units of measurement
- Kibble balance
- 2019 redefinition of the SI base units
References
- ↑ Phillip Ostwald,Jairo Muñoz, Manufacturing Processes and Systems (9th Edition)John Wiley & Sons, 1997 ISBN:978-0-471-04741-4 p. 616
- ↑ 2.0 2.1 2.2 G.M.S. de Silva (2002). Basic Metrology for ISO 9000 Certification. Butterworth-Heinemann. ISBN 0750651652.
- ↑ Burroughs, Charles J.; Benz, Samuel P.; Harvey, Todd E.; Hamilton, Clark A. (1999-06-01), "1 Volt DC Programmable Josephson Voltage Standard", IEEE Transactions on Applied Superconductivity (Institute of Electrical and Electronics Engineers (IEEE)) 9 (3): 4145–49, doi:10.1109/77.783938, ISSN 1051-8223, https://zenodo.org/record/1232191
- ↑ "17th Conférence Générale des Poids et Mesures (CGPM) – Resolution 1 of the CGPM (1983): Definition of the metre". Bureau international des poids et mesures (BIPM). http://www.bipm.org/en/CGPM/db/17/1/.
- ↑ "The Dissemination of Mass in the United States: Results and Implications of Recent BIPM Calibrations of US National Prototype Kilograms". http://nvlpubs.nist.gov/nistpubs/jres/119/jres.119.001.pdf.
- ↑ "Traceable to a National Standard (Definition)". https://www.fda.gov/Radiation-EmittingProducts/MammographyQualityStandardsActandProgram/Guidance/PolicyGuidanceHelpSystem/ucm050605.htm.
- ↑ "Michigan Department of Licensing and Regulatory Affairs – LARA > Employment Security and Workplace Safety > MIOSHA > Radiation Safety". http://www.michigan.gov/lara/0,4601,7-154-61256_11407_35791_35798-290464--,00.html.
- ↑ "National Voluntary Laboratory Accreditation Program (NVLAP) Homepage". https://www.nist.gov/nvlap/.
- ↑ "White Sand Test Facility – Measurement Standards and Calibration Laboratory". http://www.nasa.gov/centers/wstf/hardware/measurement/index.html.
 |


