Physics:Residual stress

In materials science and solid mechanics, residual stresses are stresses that remain in a solid material after the original cause of the stresses has been removed. Residual stress may be desirable or undesirable. For example, laser peening imparts deep beneficial compressive residual stresses into metal components such as turbine engine fan blades, and it is used in toughened glass to allow for large, thin, crack- and scratch-resistant glass displays on smartphones. However, unintended residual stress in a designed structure may cause it to fail prematurely.
Residual stresses can result from a variety of mechanisms including inelastic (plastic) deformations, temperature gradients (during thermal cycle) or structural changes (phase transformation). Heat from welding may cause localized expansion, which is taken up during welding by either the molten metal or the placement of parts being welded. When the finished weldment cools, some areas cool and contract more than others, leaving residual stresses. Another example occurs during semiconductor fabrication and microsystem fabrication[1] when thin film materials with different thermal and crystalline properties are deposited sequentially under different process conditions. The stress variation through a stack of thin film materials can be very complex and can vary between compressive and tensile stresses from layer to layer.
Applications
While uncontrolled residual stresses are undesirable, some designs rely on them. In particular, brittle materials can be toughened by including compressive residual stress, as in the case for toughened glass and pre-stressed concrete. The predominant mechanism for failure in brittle materials is brittle fracture, which begins with initial crack formation. When an external tensile stress is applied to the material, the crack tips concentrate stress, increasing the local tensile stresses experienced at the crack tips to a greater extent than the average stress on the bulk material. This causes the initial crack to enlarge quickly (propagate) as the surrounding material is overwhelmed by the stress concentration, leading to fracture.
A material having compressive residual stress helps to prevent brittle fracture because the initial crack is formed under compressive (negative tensile) stress. To cause brittle fracture by crack propagation of the initial crack, the external tensile stress must overcome the compressive residual stress before the crack tips experience sufficient tensile stress to propagate.
The manufacture of some swords utilises a gradient in martensite formation to produce particularly hard edges (notably the katana). The difference in residual stress between the harder cutting edge and the softer back of the sword gives such swords their characteristic curve[citation needed].

In toughened glass, compressive stresses are induced on the surface of the glass, balanced by tensile stresses in the body of the glass. Due to the residual compressive stress on the surface, toughened glass is more resistant to cracks, but shatter into small shards when the outer surface is broken. A demonstration of the effect is shown by Prince Rupert's Drop, a material-science novelty in which a molten glass globule is quenched in water: Because the outer surface cools and solidifies first, when the volume cools and solidifies, it "wants" to take up a smaller volume than the outer "skin" has already defined; this puts much of the volume in tension, pulling the "skin" in, putting the "skin" in compression. As a result, the solid globule is extremely tough, able to be hit with a hammer, but if its long tail is broken, the balance of forces is upset, causing the entire piece to shatter violently.
In certain types of gun barrels made with two tubes forced together, the inner tube is compressed while the outer tube stretches, preventing cracks from opening in the rifling when the gun is fired.
Compressive residual stress
Common methods to induce compressive residual stress are shot peening for surfaces and High frequency impact treatment for weld toes. Depth of compressive residual stress varies depending on the method. Both methods can increase lifetime of constructions significantly.

Creation of residual stress
There are some techniques which are used to create uniform residual stress in a beam. For example, the four point bend allows inserting residual stress by applying a load on a beam using two cylinders.[2] [3]
Measurement techniques

Overview
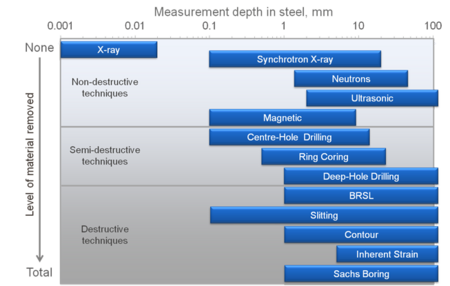
There are many techniques used to measure residual stresses, which are broadly categorised into destructive, semi-destructive and non-destructive techniques. The selection of the technique depends on the information required and the nature of the measurement specimen. Factors include the depth/penetration of the measurement (surface or through-thickness), the length scale to be measured over (macroscopic, mesoscopic or microscopic), the resolution of the information required, and also the composition geometry and location of the specimen. Additionally, some of the techniques need to be performed in specialised laboratory facilities, meaning that "on-site" measurements are not possible for all of the techniques.
Destructive techniques
Destructive techniques result in large and irreparable structural change to the specimen, meaning that either the specimen cannot be returned to service or a mock-up or spare must be used. These techniques function using a "strain release" principle; cutting the measurement specimen to relax the residual stresses and then measuring the deformed shape. As these deformations are usually elastic, there is an exploitable linear relationship between the magnitude of the deformation and magnitude of the released residual stress.[4] Destructive techniques include:
- Contour Method[5] – measures the residual stress on a 2D plane section through a specimen, in a uniaxial direction normal to a surface cut through the specimen with wire EDM.
- Slitting (Crack Compliance) [6] – measures residual stress through the thickness of a specimen, at a normal to a cut "slit".
- Block Removal/Splitting/Layering[7]
- Sachs' Boring[8]
Semi-destructive techniques
Similarly to the destructive techniques, these also function using the "strain release" principle. However, they remove only a small amount of material, leaving the overall integrity of the structure intact. These include:
- Deep Hole Drilling[9] – measures the residual stresses through the thickness of a component by relaxing the stresses in a "core" surrounding a small diameter drilled hole.
- Centre Hole Drilling[10] – measures the near-surface residual stresses by strain release corresponding to a small shallow drilled hole with a strain gauge rosette. Centre hole drilling is appropriate for up to 4 mm in depth. Alternatively, blind hole drilling can be used for thin parts. Center hole drilling can also be performed in the field for on-site testing.
- Ring Core[11] – similar to Centre Hole Drilling, but with greater penetration, and with the cutting taking place around the strain gauge rosette rather than through its centre.
Non-destructive techniques
The non-destructive techniques measure the effects of relationships between the residual stresses and their action of crystallographic properties of the measured material. Some of these work by measuring the diffraction of high frequency electromagnetic radiation through the atomic lattice spacing (which has been deformed due to the stress) relative to a stress-free sample. The Ultrasonic and Magnetic techniques exploit the acoustic and ferromagnetic properties of materials to perform relative measurements of residual stress. Non-destructive techniques include:
- Electromagnetic a.k.a. eStress - Can be used with a wide range of sample dimensions and materials, with accuracy on par to that of neutron diffraction. Portable systems are available such as the eStress system, which can be used for on-site measurements or permanently installed for continuous monitoring. Speed of measurement is 1–10 seconds per location.
- Neutron Diffraction - A proven technique that can measure through-thickness but which requires a neutron source (like a nuclear reactor).
- Synchrotron Diffraction - Requires a synchrotron but provide similarly useful data as eStress and the neutron diffraction methods.
- X-Ray Diffraction - a limited surface technique with penetration of a few hundred microns only.
- Ultrasonic - relatively new and promising experimental process known from 70s-80s of last century [14][citation needed]
- Magnetic - Can be used with very limited sample dimensions.
Relief of residual stress
When undesired residual stress is present from prior metalworking operations, the amount of residual stress may be reduced using several methods. These methods may be classified into thermal and mechanical (or nonthermal) methods.[12] All the methods involve processing the part to be stress relieved as a whole.
Thermal method
The thermal method involves changing the temperature of the entire part uniformly, either through heating or cooling. When parts are heated for stress relief, the process may also be known as stress relief bake.[13] Cooling parts for stress relief is known as cryogenic stress relief and is relatively uncommon.[citation needed]
Stress relief bake
Most metals, when heated, experience a reduction in yield strength. If the material's yield strength is sufficiently lowered by heating, locations within the material that experienced residual stresses greater than the yield strength (in the heated state) would yield or deform. This leaves the material with residual stresses that are at most as high as the yield strength of the material in its heated state.
Stress relief bake should not be confused with annealing or tempering, which are heat treatments to increase ductility of a metal. Although those processes also involve heating the material to high temperatures and reduce residual stresses, they also involve a change in metallurgical properties, which may be undesired.
For certain materials such as low alloy steel, care must be taken during stress relief bake so as not to exceed the temperature at which the material achieves maximum hardness (See Tempering in alloy steels).
Cryogenic stress relief
Cryogenic stress relief involves placing the material (usually steel) into a cryogenic environment such as liquid nitrogen. In this process, the material to be stress relieved will be cooled to a cryogenic temperature for a long period, then slowly brought back to room temperature.
Nonthermal methods
Mechanical methods to relieve undesirable surface tensile stresses and replace them with beneficial compressive residual stresses include shot peening and laser peening. Each works the surface of the material with a media: shot peening typically uses a metal or glass material; laser peening uses high intensity beams of light to induce a shock wave that propagates deep into the material.
See also
- Autofrettage
- Shot peening
- Laser peening
- Low plasticity burnishing
- High-frequency impact treatment
- Deep hole drilling (DHD) measurement technique
- Hole drilling method
References
- ↑ Schiavone, G.; Murray, J.; Smith, S.; Desmulliez, M. P. Y.; Mount, A. R.; Walton, A. J. (2016-01-01). "A wafer mapping technique for residual stress in surface micromachined films" (in en). Journal of Micromechanics and Microengineering 26 (9): 095013. doi:10.1088/0960-1317/26/9/095013. ISSN 0960-1317. Bibcode: 2016JMiMi..26i5013S. http://stacks.iop.org/0960-1317/26/i=9/a=095013.
- ↑ "Flexural Properties by Four-Point Bending ASTM D6272". ptli.com. http://www.ptli.com/testlopedia/tests/Flexural-bending-ASTM-D6272.asp.
- ↑ relaxman1993 (13 September 2014). "Tutoriel Abaqus-Contrainte résiduelle dans une poutre / Residual stress in a beam". https://www.youtube.com/watch?v=h8JHgR8_Clc.
- ↑ G.S.Schajer Practical Residual Stress Measurement Methods. Wiley 2013, 7, ISBN 978-1-118-34237-4.
- ↑ Los Alamos National Laboratory – Contour Method. Retrieved on 19 June 2014
- ↑ Los Alamos National Laboratory – Sltting Method. Retrieved on 19 June 2014
- ↑ ASTM E1928-13 Standard Practice for Estimating the Approximate Residual Circumferential Stress in Straight Thin-walled Tubing. Retrieved on 19 June 2014
- ↑ VEQTER Ltd – Sach's Boring. Retrieved on 19 June 2014
- ↑ VEQTER Ltd – Deep Hole Drilling. Retrieved on 19 June 2014
- ↑ G2MT Labs – Centre Hole Drilling . Retrieved on 22 Feb 2018
- ↑ VEQTER Ltd – Ring Core. Retrieved on 19 June 2014
- ↑ "Stress Relief Basics - September 2001". http://www.aws.org/wj/sept01/cullison.html.
- ↑ "Plating". plating.com. http://www.plating.com/platingtechnical/surfacefinishing.htm.
Further reading
- Hosford, William F. 2005. "Residual Stresses." In Mechanical Behavior of Materials, 308–321. Cambridge University Press. ISBN 978-0-521-84670-7
- Cary, Howard B. and Scott C. Helzer (2005). Modern Welding Technology. Upper Saddle River, New Jersey: Pearson Education. ISBN 0-13-113029-3
- Schajer, Gary S. 2013. Practical Residual Stress Measurement Methods. Wiley. ISBN 978-1-118-34237-4
- Kehl, J.-H., Drafz, R., Pape, F. and Poll, G. 2016. Simulative investigations of the influence of surface indentations on residual stresses on inner raceways for roller element bearings, International Conference on Residual Stresses 2016 (Sydney), DOI: 10.21741/9781945291173-69
External links
- Energy-saving technology and computerized equipment for vibration stabilization of residual stress (the only CIS 35-year-old Scientific School, who presented in 1988, the world's first installation of computer diagnostics) are intended to stabilize the residual stresses in welds, castings and other non-rigid dynamic metal
- Comprehensive resources on Residual stresses at Cambridge University
 |
