Prototype pattern
This article has multiple issues. Please help improve it or discuss these issues on the talk page. (Learn how and when to remove these template messages)
(Learn how and when to remove this template message)No issues specified. Please specify issues, or remove this template. |
The prototype pattern is a creational design pattern in software development. It is used when the types of objects to create is determined by a prototypical instance, which is cloned to produce new objects. This pattern is used to avoid subclasses of an object creator in the client application, like the factory method pattern does, and to avoid the inherent cost of creating a new object in the standard way (e.g., using the 'new' keyword) when it is prohibitively expensive for a given application.
To implement the pattern, the client declares an abstract base class that specifies a pure virtual clone() method. Any class that needs a "polymorphic constructor" capability derives itself from the abstract base class, and implements the clone() operation.
The client, instead of writing code that invokes the "new" operator on a hard-coded class name, calls the clone() method on the prototype, calls a factory method with a parameter designating the particular concrete derived class desired, or invokes the clone() method through some mechanism provided by another design pattern.
The mitotic division of a cell — resulting in two identical cells — is an example of a prototype that plays an active role in copying itself and thus, demonstrates the Prototype pattern. When a cell splits, two cells of identical genotype result. In other words, the cell clones itself.[1]
Overview
The prototype design pattern is one of the 23 Gang of Four design patterns that describe how to solve recurring design problems to design flexible and reusable object-oriented software, that is, objects that are easier to implement, change, test, and reuse.[2]: 117
The prototype design pattern solves problems like:[3]
- How can objects be created so that the specific type of object can be determined at runtime?
- How can dynamically loaded classes be instantiated?
Creating objects directly within the class that requires (uses) the objects is inflexible because it commits the class to particular objects at compile-time and makes it impossible to specify which objects to create at run-time.
The prototype design pattern describes how to solve such problems:
- Define a
Prototypeobject that returns a copy of itself. - Create new objects by copying a
Prototypeobject.
This enables configuration of a class with different Prototype objects, which are copied to create new objects, and even more, Prototype objects can be added and removed at run-time.
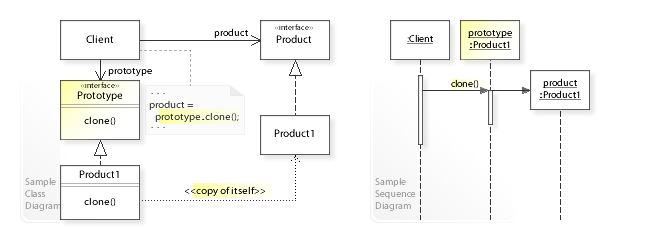
See also the UML class and sequence diagram below.
Structure
UML class and sequence diagram

In the above UML class diagram,
the Client class refers to the Prototype interface for cloning a Product.
The Product1 class implements the Prototype interface by creating a copy of itself.
The UML sequence diagram shows the run-time interactions:
The Client object calls clone() on a prototype:Product1 object, which creates and returns a copy of itself (a product:Product1 object).
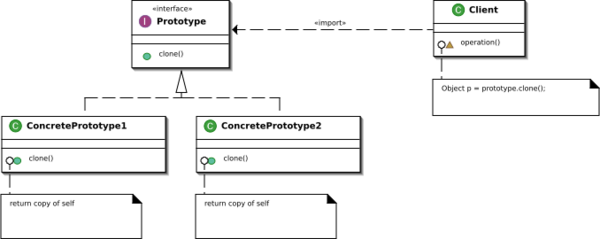
UML class diagram

Rules of thumb
Sometimes creational patterns overlap—there are cases when either prototype or abstract factory would be appropriate. At other times, they complement each other: abstract factory might store a set of prototypes from which to clone and return product objects.[2]: 126 Abstract factory, builder, and prototype can use singleton in their implementations.[2]: 81, 134 Abstract factory classes are often implemented with factory methods (creation through inheritance), but they can be implemented using prototype (creation through delegation).[2]: 95
Often, designs start out using Factory Method (less complicated, more customizable, subclasses proliferate) and evolve toward abstract factory, prototype, or builder (more flexible, more complex) as the designer discovers where more flexibility is needed.[2]: 136
Prototype does not require subclassing, but it does require an "initialize" operation. Factory method requires subclassing, but does not require initialization.[2]: 116
Designs that make heavy use of the composite and decorator patterns often can benefit from Prototype as well.[2]: 126
A general guideline in programming suggests using the clone() method when creating a duplicate object during runtime to ensure it accurately reflects the original object. This process, known as object cloning, produces a new object with identical attributes to the one being cloned. Alternatively, instantiating a class using the new keyword generates an object with default attribute values.
For instance, in the context of designing a system for managing bank account transactions, it may be necessary to duplicate the object containing account information to conduct transactions while preserving the original data. In such scenarios, employing the clone() method is preferable over using new to instantiate a new object.
Example
C++23 Example
This C++23 implementation is based on the pre-C++98 implementation in the book. Discussion of the design pattern along with a complete illustrative example implementation using polymorphic class design are provided in the C++ Annotations.
import std;

using std::array;
using std::shared_ptr;
using std::unique_ptr;
using std::vector;

enum class Direction: char {
    North,
    South,
    East,
    West
};

class MapSite {
public:
    virtual void enter() = 0;
    virtual unique_ptr<MapSite> clone() const = 0;
    virtual ~MapSite() = default;
};

class Room: public MapSite {
private:
    int roomNumber;
    shared_ptr<array<shared_ptr<MapSite>, 4>> sides;
public:
    Room():
        roomNumber{0}, sides{std::make_shared<array<shared_ptr<MapSite>, 4>>()} {}

    explicit Room(int n):
        roomNumber{n}, sides{std::make_shared<array<shared_ptr<MapSite>, 4>>()} {}

    Room& setSide(Direction d, shared_ptr<MapSite> ms) {
        (*sides)[static_cast<size_t>(d)] = std::move(ms);
        std::println("Room::setSide {} ms", d);
        return *this;
    }

    virtual void enter() override {}

    virtual unique_ptr<MapSite> clone() const override {
        return std::make_unique<Room>(*this);
    }

    Room(const Room&) = delete;
    Room& operator=(const Room&) = delete;
};

class Wall: public MapSite {
public:
    Wall():
        MapSite() {}

    virtual void enter() override {}

    nodiscard
    virtual unique_ptr<MapSite> clone() const override {
        return std::make_unique<Wall>(*this);
    }
};

class Door: public MapSite {
private:
    shared_ptr<Room> room1;
    shared_ptr<Room> room2;

public:
    explicit Door(shared_ptr<Room> r1 = nullptr, shared_ptr<Room> r2 = nullptr):
        MapSite(), room1{std::move(r1)}, room2{std::move(r2)} {}

    virtual void enter() override {}

    nodiscard
    virtual unique_ptr<MapSite> clone() const override {
        return std::make_unique<Door>(*this);
    }

    void initialize(shared_ptr<Room> r1, shared_ptr<Room> r2) {
        room1 = std::move(r1);
        room2 = std::move(r2);
    }

    Door(const Door&) = delete;
    Door& operator=(const Door&) = delete;
};

class Maze {
private:
    vector<shared_ptr<Room>> rooms;
public:
    Maze& addRoom(shared_ptr<Room> r) {
        std::println("Maze::addRoom {}", reinterpret_cast<void*>(r.get()));
        rooms.push_back(std::move(r));
        return *this;
    }

    nodiscard
    shared_ptr<Room> roomNo(int n) const {
        for (const Room& r: rooms) {
            // actual lookup logic here...
        }
        return nullptr;
    }

    nodiscard
    virtual unique_ptr<Maze> clone() const {
        return std::make_unique<Maze>(*this);
    }
};

class MazeFactory {
public:
    MazeFactory() = default;

    virtual ~MazeFactory() = default;

    nodiscard
    virtual unique_ptr<Maze> makeMaze() const {
        return std::make_unique<Maze>();
    }

    nodiscard
    virtual shared_ptr<Wall> makeWall() const {
        return std::make_shared<Wall>();
    }

    nodiscard
    virtual shared_ptr<Room> makeRoom(int n) const {
        return std::make_shared<Room>(n);
    }

    nodiscard
    virtual shared_ptr<Door> makeDoor(shared_ptr<Room> r1, shared_ptr<Room> r2) const {
        return std::make_shared<Door>(std::move(r1), std::move(r2));
    }
};

class MazePrototypeFactory: public MazeFactory {
private:
    unique_ptr<Maze> prototypeMaze;
    shared_ptr<Room> prototypeRoom;
    shared_ptr<Wall> prototypeWall;
    shared_ptr<Door> prototypeDoor;
public:
    MazePrototypeFactory(unique_ptr<Maze> m, shared_ptr<Wall> w, shared_ptr<Room> r, shared_ptr<Door> d):
        MazeFactory(), prototypeMaze{std::move(m)}, prototypeRoom{std::move(r)},
        prototypeWall{std::move(w)}, prototypeDoor{std::move(d)} {}

    virtual unique_ptr<Maze> makeMaze() const override {
        return prototypeMaze->clone();
    }

    nodiscard
    virtual shared_ptr<Room> makeRoom(int n) const override {
        return prototypeRoom->clone();
    }

    nodiscard
    virtual shared_ptr<Wall> makeWall() const override {
        return prototypeWall->clone();
    }

    nodiscard
    virtual shared_ptr<Door> makeDoor(shared_ptr<Room> r1, shared_ptr<Room> r2) const override {
        shared_ptr<Door> door = prototypeDoor->clone();
        door->initialize(std::move(r1), std::move(r2));
        return door;
    }

    MazePrototypeFactory(const MazePrototypeFactory&) = delete;
    MazePrototypeFactory& operator=(const MazePrototypeFactory&) = delete;
};

class MazeGame {
public:
    nodiscard
    unique_ptr<Maze> createMaze(MazePrototypeFactory& factory) {
        unique_ptr<Maze> maze = factory.makeMaze();
        shared_ptr<Room> r1 = factory.makeRoom(1);
        shared_ptr<Room> r2 = factory.makeRoom(2);
        shared_ptr<Door> door = factory.makeDoor(r1, r2);

        maze->addRoom(std::move(r1))
            .addRoom(std::move(r2));

        r1->setSide(Direction::North, factory.makeWall())
            .setSide(Direction::East, door)
            .setSide(Direction::South, factory.makeWall())
            .setSide(Direction::West, factory.makeWall());

        r2->setSide(Direction::North, factory.makeWall())
            .setSide(Direction::East, factory.makeWall())
            .setSide(Direction::South, factory.makeWall())
            .setSide(Direction::West, door);

        return maze;
    }
};

int main(int argc, char* argv[]) {
    MazeGame game;
    MazePrototypeFactory simpleMazeFactory(
        std::make_unique<Maze>(),
        std::make_shared<Wall>(),
        std::make_shared<Room>(0),
        std::make_shared<Door>()
    );

    unique_ptr<Maze> maze = game.createMaze(simpleMazeFactory);
}
The program output is:
Maze::addRoom 0x1160f50
Maze::addRoom 0x1160f70
Room::setSide 0 0x11613c0
Room::setSide 2 0x1160f90
Room::setSide 1 0x11613e0
Room::setSide 3 0x1161400
Room::setSide 0 0x1161420
Room::setSide 2 0x1161440
Room::setSide 1 0x1161460
Room::setSide 3 0x1160f90
See also
| The Wikibook Computer Science Design Patterns has a page on the topic of: Prototype implementations in various languages |
References
- ↑ Duell, Michael (July 1997). "Non-Software Examples of Design Patterns". Object Magazine 7 (5): 54. ISSN 1055-3614.
- ↑ 2.0 2.1 2.2 2.3 2.4 2.5 2.6 Design Patterns: Elements of Reusable Object-Oriented Software. Addison-Wesley. 1994. ISBN 0-201-63361-2. https://archive.org/details/designpatternsel00gamm.
- ↑ "The Prototype design pattern - Problem, Solution, and Applicability". http://w3sdesign.com/?gr=c04&ugr=proble.
 |
